harald

Moved from Germany to Japan in 2000. Since then, living here in the land of tasty food and cheap Internet access. I could not be happier!

Dec 252017
 

I got my blog here for a long time. Moving from stand-alone into Docker containers, moving those from AWS to GC to Linode servers, and now to AWS again. At least for the time being.

The new part is that the new blog won’t be WordPress anymore, but in order to carry over the old blog, I simply copied it via the awesome HTTrack

The new location also changes the domain: https://harald.aws.qw2.org/wordpress/index.html


 Posted by at 21:10  Tagged with:
Dec 022017
 

Whoa…AWS is not joking when saying that in AWS Simple Queue Service the order is not guaranteed. I send in this (in exactly that order):

100, 101, 102, 103, 104, 105, 106, 107, 108, 109

and I receive this:

108, 102, 106, 101, 105, 109, 100, 103, 104, 107


 Posted by at 21:26  Tagged with:
Nov 052017
 
AWS - Route53 and your own IP

AWS is functionally very nice, but the docs are…improvable. Thus the need for me to write down things which should be simple but are not:

Updating DNS Records

Very easy to do in the GUI. Tricky the first time you try this from the aws CLI.

I got a delegated zone aws.XXX. (I own XXX and i delegated aws.XXX. to AWS Route53) and when I boot my (special) EC2 instance, I’d like it to update the DNS record ec2.aws.XXX. accordingly.

Here the needed batch file (stored in the file “dnsupdate.json”)

{ 
  "Comment": "Updating my EC2 instance DNS record", 
  "Changes": [ 
    { 
      "Action": "UPSERT", 
      "ResourceRecordSet": { 
        "Name": "ec2.aws.XXX.", 
        "Type": "A", 
        "TTL": 300, 
        "ResourceRecords": [ 
          { 
            "Value": "34.207.167.92" 
          } 
        ] 
      } 
    } 
  ] 
}

Pitfall 1: “Name” is the full FQDN. Get your current IP via

curl http://169.254.169.254/latest/meta-data/public-ipv4

Then update via aws CLI:

aws route53 change-resource-record-sets --hosted-zone-id Z1KXXXXXXXXXX \
--change-batch file:///home/ec2-user/dnsupdate.json

Pitfall 2: The batch file location MUST NOT be the simple “dnsupdate.json” but it MUST BE “file://absolute/path/to/the/file.json”. Otherwise you get the totally unhelpful error message

aws route53 change-resource-record-sets --hosted-zone-id Z1KXXXXXXXXXX \
--change-batch dnsupdate.json                        

Error parsing parameter '--change-batch': Expected: '=', received: 'EOF' for input: 
dnsupdate.json 
               ^


Oct 082017
 
3D Printing - Finally

I was originally looking for a simple linear rail: have a stepper at one end, a stepper driver, and some mechanism to move something back and forth. Preferable fast and slow. Turns out that linear rails usually come in industrial type with a lot of power but lacking speed, or like this which approaches quickly US$100 without a motor/driver etc.

The cheapest way to get such rails seems to be via a 3D printer. Specifically the Delta type like the Kossel. Got 3 rails, motors, all the mechanics, and some models have a linear rail. Or alternatively a simpler pull carriage which moves in the grooves of the typically used Aluminium profiles.

So I tried to find the cheapest Kossel type 3D printer as the goal was to get a rail (or 3). However when looking at the prices, I opted for a heated bed too since I heard from friends with 3D printers that a heated bed is critical for several types of plastic (e.g. ABS). At about US$40 more for a heated bed and a corresponding more powerful PSU it was a good deal. Lucky me to get the stronger PSU. You’ll see later why.

Turns out that this 3D printer stuff is way more fun than expected and now it’s a 3D printer. But now I can make myself the parts for a linear rail. Minus the Aluminium profile, but that’s easy to get. The remaining pieces is a stepper, a driver, a belt, a pulley would need wheels and bearings, or a linear rail. The set came with an extra driver (A4988) and an extra 12V 6A PSU (I got the heating bed model which includes a 20A PSU, so I got 2).

A short review of the AnyCubic impresora (Kossel Mini type)

The good

  • Everything is well packed. Nothing broken. Nothing bent.
  • 1 kg black PLA is included, so that it’s really ready-to-go.
  • Mainboard is nice and clean. Single board called Trigorilla with an Atmel ATMega2560, which means it’s basically a Arduino Mega including the special drivers a 3D printer needs.
  • Software for the Trigorilla is the usual Marlin
  • The LCD is easy to read with a convenient rotary encoder which can be pushed down.
  • There’s an SD card slot (full size SD card)
  • Included is an SD card (8 GB!) pre-populated with drivers, software, manual and several models
  • A printed manual is included. And it’s worth reading! Definitely one of the better manuals.

The not-so-good

  • Initial prints worked for some minutes or seconds, but then the controller rebooted. I suspected the PSU since all programming and reprogramming with Arduino worked just fine, but when the printer and the heating element (not the heating bed) was in use, it stopped relatively soon (within the first minutes) with a reset. Good thing I had a stronger 20A PSU and it fixed all problems in this regard.
  • The tube of the filament feeder is not Teflon. It seems to reasonably work though, but I read that Teflon is very much preferred as it’s slippery. Time will tell.
  • The filament feeder sometimes does not want to feed. It makes clack-clack sounds. Pushing the filament manual helps.
  • The rail mounted plastic piece is improvable: the z-height screw is easy to over-torque, and the mount to the rail has some slop.
  • The powerful PSU included in the heating bed model has no bracket and is thus just sitting on the table. Luckily we have a 3D printer and PLA to print a PSU holder by BlakeMcCoy
  • The small PSU (has a on/off switch integrated into the cable). The large one does not.
  • While the claimed diameter of the model is 180mm, when you move to certain positions on the bed, you’ll hit the bottom mechanical end-stops of one of the rails. 160mm diameter is safe. More is doable if the model is oriented right or it’s wider when it’s not at the bottom, like a vase.
  • The Aluminium heat bed is supposed to be below the glass plate, but that also means it’s directly above the Trigorilla board and the hot stepper drivers. The simple fix is a cork plate which insulates the heat bed and the bottom area. But then the supplied plate holder need to be taller. Luckily BlakeMcCoy solved that too. I am concerned about using PLA for this though. (Update: It seems to work. I keep the heat bed to <50°C which is more than enough for PLA)
  • The mentioned rotary encoder sometimes moves a menu item up before pushing it.
  • The PSU power cable of the 20A PSU has no screw terminals.
  • The stepper drivers get quite hot. Some air flow would be nice. Here is a good solution.
  • It would be nice to have the filament spool at the frame, either top or side.

The bad

  • Using screw terminals at 11A is…well…not good. Using solder at the end is not great either. Screw terminals would be the safer bet. Unfortunately fixing this is impossible without de-soldering a screw terminal on the Trigorilla board.
    Double bad as the opposite site of the cable has nice screw terminals on the PSU side.

Summary

Calibrating this printer was not that difficult once you know how to calibrate a delta printer: Adjust z-axis top stops so that 0.0mm at the bed is touching the bed. If center is 0.0mm now too, you are pretty much done. The rest is software and a test print with a calibration piece like this shows all is good. All my prints (so far) worked. Circles are circles. Squares are squares. And flat tops are flat. Speaks for the mechanical properties of the printer.

From an electrical safety point-of-view, it’s a improvable, however thanks to having a 3D printer, most can be fixed easily. Except those screw terminals for the 11A for the heating bed.

Aug 262017
 
Crunchzilla, German and Japanese

Recently for an initiative of my workplace I was looking for a programming course for children. Think “Hour of Code”, but make that 3 hours and “real” programming. “Real” programming means: typing code and getting potentially syntax errors. Target age bracket was 11-14 years old (Junior High School in Japan).

http://www.crunchzilla.com/code-monster looked by far best, however we are in Japan and children don’t need to be distracted with English when learning something new like JavaScript. So I extended the code to include more languages (German first as I can handle all aspects of it, but the main target was Japanese). The code was the easy part. The text and explanations were a lot of work. I’d guess 40h for German, but easily double that for Japanese since you have to watch out to use Kanjis which the children of that age were taught. Thanks for the Japanese translation go to my coworkers and for my wife who all contributed.

Well, it’s done and it was a success: children liked it and it worked flawlessly. The forked repo is here and if you are impatient, you can learn it directly from this link.

Greg was kind enough to merge my changes, so anyone can now relatively painlessly add more languages.


Jul 292017
 
Serverless Computing AKA FaaS

While looking into what “Serverless Computing” means as it looks like an oxymoron, I created a presentation for my workplace’s “Knowledge Sharing” series. Total of 140 people attended. Last year’s Docker presentation was about 200.

I removed the counter and translation example for cost reasons. The example code is on GitHub for everyone to play with. Here the slides.


Jun 262017
 

Reading all this nice stuff about TDD. Using the Espruino GUI suddenly feels limiting. It’s great for testing and small things less than 1000 lines, but once you want modules and testing, it fails as it’s simply not made for that.

But there’s a fix, at least for me: https://github.com/haraldkubota/esp32

In short:

  • browserify to make a single JavaScipt file out of modules
  • Jest for testing
  • make to bundle it all together (ok, I do use npm too, but make it nicer IMHO)
  • netcat to upload the code

ESP32 with BME280, showing its measured data with sparklines

The sparkline as well as the circular buffer code it uses was attempted to be written via TDD. I think I failed partially here, but I still have plenty tests. When restructuring the code I was happy about the tests as they confirmed all is still working! Hooray for tests!

Jun 042017
 
Google Cloud, Authentication, Storage and NodeJS

How to use Cloud Storage from NodeJS? It’s actually easy once you found the libraries to use and a sample which works. But finding this was a long journey which took most of a day. Here was the most useful article of Sebastien having had the same problem. Shortly later I found this: https://googlecloudplatform.github.io/google-cloud-node/#/docs/storage/1.1.0/storage which helped a lot.

The short summary here in the hope that someone might read this and get a simple working example of NodeJS+Google Cloud Storage.

Pre-Requisite: Access

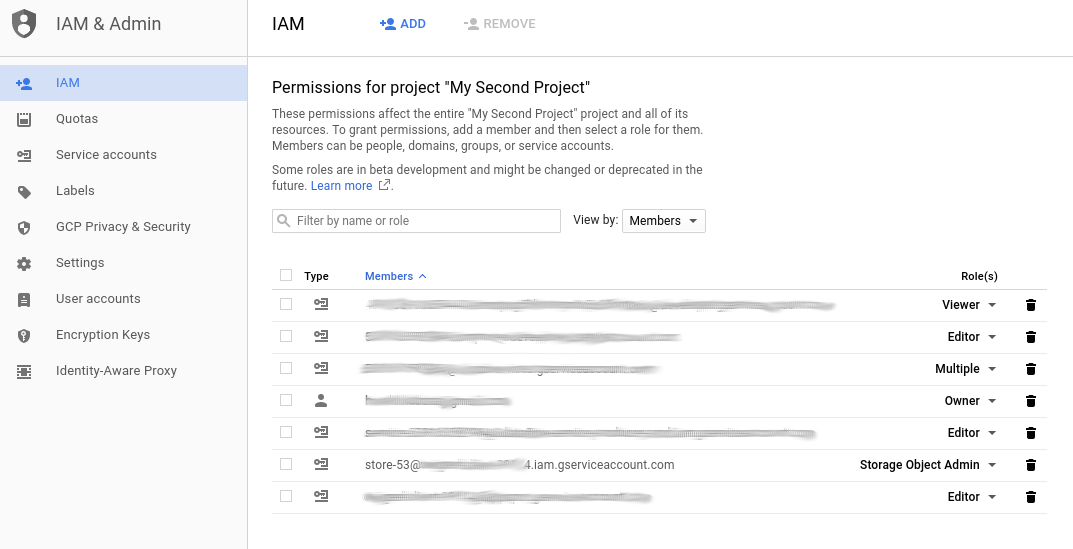
On the Google Cloud Console, go to IAM & Admin, create a Service Account, and create a key for it. Keep this key. It’s the JSON key in the keyFilename. This plus the projectID plus permissions is all you need to get access.

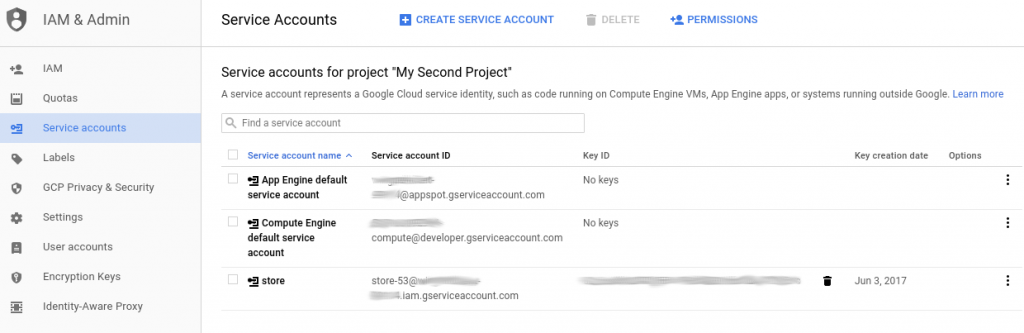
Under IAM you change the role of the new service account to Storage Admin to see all buckets. if you only want to connect to one bucket, use Storage Object Admin. Or less depending on what you need.

BTW updating permissions is almost instantly.

Task 1: See Buckets

This is the NodeJS program running on my home PC. I split it into 3 parts, but it’s really one file

The service accounts needs Storage Object Admin permississions for this.

var gcs = require('@google-cloud/storage')({
 projectId: 'some-thing-12345',
 keyFilename: './KEY.json'  // absolute path ok too
});
// GOOGLE_APPLICATION_CREDENTIALS=$keyFilename was not needed
// contrary to some documentation

gcs.getBuckets(function(err, buckets) {
 if (!err) {
  buckets.forEach(function(value){
  console.log("name: "+value.metadata.name);
  console.log("location: "+value.metadata.location);
  }); 
 } else {
  console.log(err);
 }
});

2. Look Inside Buckets

Service account needs Storage Object Viewer (read-only) resp. Creator (read/write).

// List contents of bucket 'some-test-1'

var wt1 = gcs.bucket('some-test-1');

wt1.getFiles(function(err, files) {
 if (!err) {
  files.forEach(x=>{console.log("Name: "+x.name)});
  // files is an array of File objects.
 } else {
  console.log(err);
 }
});

3. Access Files in a Bucket

Service account needs Storage Object Viewer (read-only) resp. Creator (read/write)

// Download a file (resp. create a read-stream)

var fs = require('fs');
var remoteFile = wt1.file('f1/a1.sh');
var localFilename = 'test-a1.sh';

remoteFile.createReadStream()
 .on('error', function(err) {
  console.log(err);
  })
 .on('response', function(response) {
 // Server connected and responded with the specified status and headers.
  })
 .on('end', function() {
  // The file is fully downloaded.
  })
 .pipe(fs.createWriteStream(localFilename));


May 282017
 

To program the ESP32 is usually a bit of luck and sometimes pressing the reset button if you’re less lucky.

RTS and/or DTR should be able to reset the ESP32. Once it’s reliably reset, a download via netcat works. If I only had a program to reset RTS and/or DTR!

I found one here, changed it to toggle DTR instead of RTS as toggling RTS did not do anything. Now I can reset the ESP32 reliably. Full automation is achieved!

Here the DTR toggle program:

#include <stdio.h>
#include <stdlib.h>
#include <termios.h>
#include <unistd.h>
#include <sys/ioctl.h>
#include <sys/types.h>
#include <sys/stat.h>
#include <fcntl.h>


static struct termios oldterminfo;


void closeserial(int fd)
{
 tcsetattr(fd, TCSANOW, &oldterminfo);
 if (close(fd) < 0)
 perror("closeserial()");
}


int openserial(char *devicename)
{
 int fd;
 struct termios attr;

 if ((fd = open(devicename, O_RDWR)) == -1) {
 perror("openserial(): open()");
 return 0;
 }
 if (tcgetattr(fd, &oldterminfo) == -1) {
 perror("openserial(): tcgetattr()");
 return 0;
 }
 attr = oldterminfo;
 attr.c_cflag |= CRTSCTS | CLOCAL;
 attr.c_oflag = 0;
 if (tcflush(fd, TCIOFLUSH) == -1) {
 perror("openserial(): tcflush()");
 return 0;
 }
 if (tcsetattr(fd, TCSANOW, &attr) == -1) {
 perror("initserial(): tcsetattr()");
 return 0;
 }
 return fd;
}


int setSerial(int fd, int bitmask, int level)
{
 int status;

 if (ioctl(fd, TIOCMGET, &status) == -1) {
 perror("setSerial(): TIOCMGET");
 return 0;
 }
 if (level)
 status |= bitmask;
 else
 status &= ~bitmask;
 if (ioctl(fd, TIOCMSET, &status) == -1) {
 perror("setSerial(): TIOCMSET");
 return 0;
 }
 return 1;
}


int main(int argc, char *argv[])
{
 int fd;
 char *serialdev = "/dev/ttyUSB0";
 int bitmask;

 if (argc == 2) {
 serialdev = argv[1];
 }

 // printf("device: %s\n", serialdev);


 fd = openserial(serialdev);
 if (!fd) {
 fprintf(stderr, "Error while initializing %s.\n", serialdev);
 return 1;
 }

 bitmask = TIOCM_DTR; // alternatively TIOCM_RTS | TIOCM_DTR

 setSerial(fd, bitmask, 0);
 sleep(1); /* pause 1 second */
 setSerial(fd, bitmask, 1);

 closeserial(fd);
 return 0;
}

And the program to upload to the ESP (via netcat):

#!/bin/bash 
# 
# Upload JS file to ESP32 via wifi 
# 
# Usage: 
# uploadesp.sh JAVASCRIPTFILE IPADDRESS 
 
if [[ $# -ne 2 ]] ; then 
        echo "Usage: $0 JAVASCRIPTFILE IPADDRESS" 
        exit 20 
fi 
 
if [[ ! -f "$1" ]] ; then 
        echo "ERROR: Cannot read file \"$1\"" 
        exit 10 
fi 
 
dtr-toggle 
 
TMP="$(mktemp).js" 
espruino -n -o $TMP $1 
echo "Uploading to $2:23" 
nc $2 23 < $TMP >/dev/null 
 
# rm $TMP 
exit 0