harald

Moved from Germany to Japan in 2000. Since then, living here in the land of tasty food and cheap Internet access. I could not be happier!

May 282017
 
ESP32 and Espruino

Those ESP modules and Espruino are a very attractive combination. The latest one I ordered is particularily nice: ESP32 with plenty RAM (512 KB), 2 cores, with a 128×64 pixel OLED, plus Espruino. Sweet!

./esptool.py --chip esp32 --port /dev/ttyUSB0 --baud 921600 \
  --before default_reset --after hard_reset write_flash \
  -z --flash_mode qio --flash_freq 80m --flash_size detect \
  0x1000 /tmp/espruino_1v92.71_esp32/bootloader.bin \
  0x8000 /tmp/espruino_1v92.71_esp32/partitions_espruino.bin \
  0x10000 ../Espruino/espruino_esp32.bin

The bootloader.bin and partitions_espruino.bin come from the Travis cutting-edge builds. The binary I compiled from https://github.com/espruino/Espruino

Connecting via Web IDE works usually. In case of problems, use minicom to connect (115200 baud). Pushing the reset button always works. At this point the Web IDE will connect too.

Uploading code via Web IDE works. 100% reliable as far as I can say. But I wanted a command line uploads to do things like TypeScript and use make or Jenkins for build, test, upload cycles.

https://www.npmjs.com/package/espruino is a NPM modules for NodeJS which makes this possible. However direct uploads via serial port (/dev/ttyUSB0) does not work reliable (<10% success). Turns out there’s a better way:

#!/bin/bash
# Usage: uploadesp.sh JAVASCRIPT_FILE.js IP_OF_ESP32 
TMP=$(mktemp)
espruino -n -o $TMP $1
nc $2 23 < $TMP >/dev/null

That’s 100% working so far and much, much faster to upload. Note that the espruino command (actually espruino-cli.js) needs some changes to recognize the -n option to not talk to the serial interface.

Update: dio and 40MHz works fine too.

May 212017
 

ESP8285

Espruino does not need more than 1 MB of Flash memory, so using a single chip solution with 1 MB Flash integrated like the ESP8285 seesm to be a sensible choice. And it works with Espruino just like the ESP8266 does.

The only special part is how to flash it:

esptool.py --port /dev/ttyUSB0 --baud 115200 write_flash \
--flash_mode dout --flash_size 8m \
0x0000 boot_v1.6.bin \
0x1000 espruino_esp8266_user1.bin \
0xFC000 esp_init_data_default.bin 0xFE000 blank.bin

There’s no difference when it comes to save(): only very small programs can be saved. I hope the ESP32 is better in this regard.

Mar 252017
 
STM32F4 Discovery and Espruino

Some time ago I installed Espruino on the STM32F4 Discovery board.

Here my notes:

sudo aptitude install cmake libusb-1.0-0-dev
git clone https://github.com/texane/stlink.git
cd stlink
cmake .
make
# install into /usr/local/
sudo make install
sudo ldconfig -v

How you should be able to see the STM32F4 Discovery board:

$ sudo st-info --probe 
Found 1 stlink programmers 
 serial: 563f6b06493f51521236213f 
openocd: "\x56\x3f\x6b\x06\x49\x3f\x51\x52\x12\x36\x21\x3f" 
  flash: 1048576 (pagesize: 16384) 
   sram: 196608 
 chipid: 0x0413 
  descr: F4 device

and now flash:

 
$ sudo st-flash write espruino_1v91_stm32f4discovery.bin 0x08000000                                
st-flash 1.3.1-11-g78ced6a 
2017-03-25T20:41:03 INFO src/common.c: Loading device parameters.... 
2017-03-25T20:41:03 INFO src/common.c: Device connected is: F4 device, id 0x10016413 
2017-03-25T20:41:03 INFO src/common.c: SRAM size: 0x30000 bytes (192 KiB), Flash: 0x100000 bytes (1024 KiB) in pages of 16
384 bytes 
2017-03-25T20:41:03 INFO src/common.c: Attempting to write 298872 (0x48f78) bytes to stm32 address: 134217728 (0x8000000) 
Flash page at addr: 0x08040000 erasedEraseFlash - Sector:0x6 Size:0x20000  
2017-03-25T20:41:09 INFO src/common.c: Finished erasing 7 pages of 131072 (0x20000) bytes 
2017-03-25T20:41:09 INFO src/common.c: Starting Flash write for F2/F4/L4 
2017-03-25T20:41:09 INFO src/flash_loader.c: Successfully loaded flash loader in sram 
enabling 32-bit flash writes 
size: 32768 
size: 32768 
size: 32768 
size: 32768 
size: 32768 
size: 32768 
size: 32768 
size: 32768 
size: 32768 
size: 3960 
2017-03-25T20:41:13 INFO src/common.c: Starting verification of write complete 
2017-03-25T20:41:16 INFO src/common.c: Flash written and verified! jolly good!

How you should be able to see the STM32F4 Discovery board:

And here a small program which reads out the accelerometer LIS302DL and the most upper LED will be lit up. Be aware that on newer F4 Discovery boards this model has changed to LIS3DSH, which is not compatibel.

function onInit() {
 SPI1.setup({sck: A5, miso:A6, mosi:A7});
 SPI1.send([0x20,0b01000111], E3);
}

var avrx=0.0, avry=0.0;
function getAcc() {
  var accx = SPI1.send([0xA9,0], E3)[1];
  var accy = SPI1.send([0xAB,0], E3)[1];
  if (accx>127) accx-=256;
  if (accy>127) accy-=256;
  avrx = 0.1*accx + 0.9*avrx;
  avry = 0.1*accy + 0.9*avry;
  digitalWrite(LED1, avrx > 32);
  digitalWrite(LED4, avrx < -32);
  digitalWrite(LED2, avry > 32);
  digitalWrite(LED3, avry < -32);
}
onInit();setInterval(getAcc, 10);

Mar 202017
 

Bluetooth and its LE variant are new areas for me and, but the learning curve is not too steep thanks to Puck.js. Making  it do what I want is not easy though since I don’t know what it can do.

The most important documents are:

Here an example:

// Have a service to show temperature and battery level
// This is only visible when you are connecting to the Puck

var currentTemperature=E.getTemperature().toFixed(2)*100;

console.log("Temp: "+currentTemperature);

NRF.setServices({
 0x1809 : { // Health Thermometer
  0x2A6E: { // Temperature
   readable: true,
   notify: true,
   value : [ currentTemperature % 256, currentTemperature / 256 ]
  }
 },
 0x180f : { // Battery Level
  0x2a19 : { // Percentage
   readable : true,
   notify: true,
   value: [ Puck.getBatteryPercentage() ],
  }
 }
});

// Updating the temperature

setInterval(function() {
 currentTemperature += 1; // For debugging: increase temp by 0.01 degree per update
 NRF.updateServices({
  0x1809 : {
   0x2A6E : {
    value : [ currentTemperature % 256, currentTemperature / 256 ],
    notify: true
   }
  }
 });
}, 2000);

Mar 112017
 

My Espruino has colored I/O pins and since I saw this, I thought “That’s neat!”

Playing with the Orange Pi Zero and its 26 pin expansion port made me really want those colored pins as connecting things wrong can destroy ports quickly: 5V and 3.3V mixed up? Magic smoke escapes. Connected GND instead of I/O pin? 50% chance of a dead output port. Miss-counted pins and used pin 11 instead of 13…happy debugging!

The Asus Tinkerboard has it too:

but it seems this is not available without the rest of the Tinkerboard.

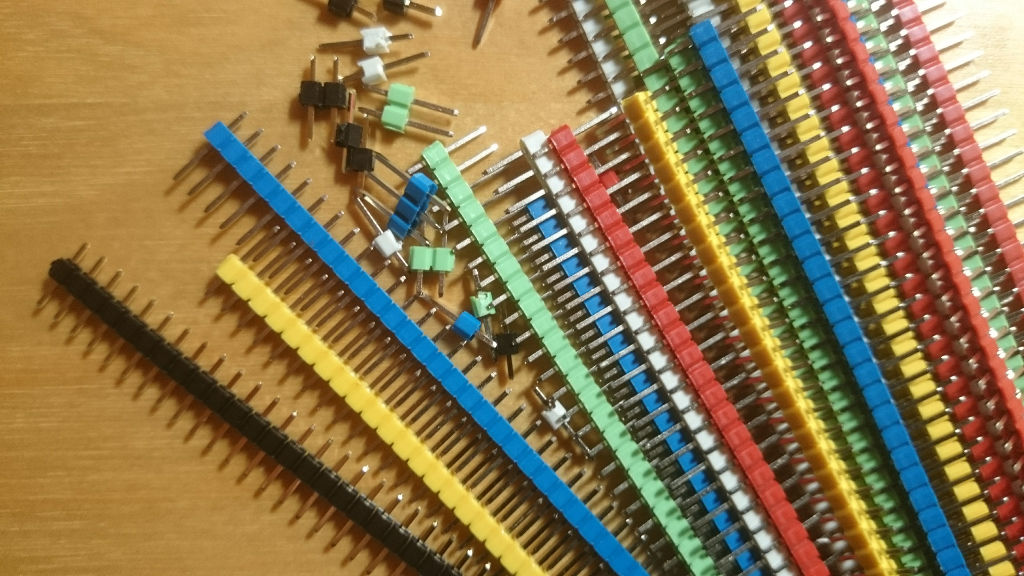
I had to build one from coloured 40 pin single row pins I got from AliExpress:

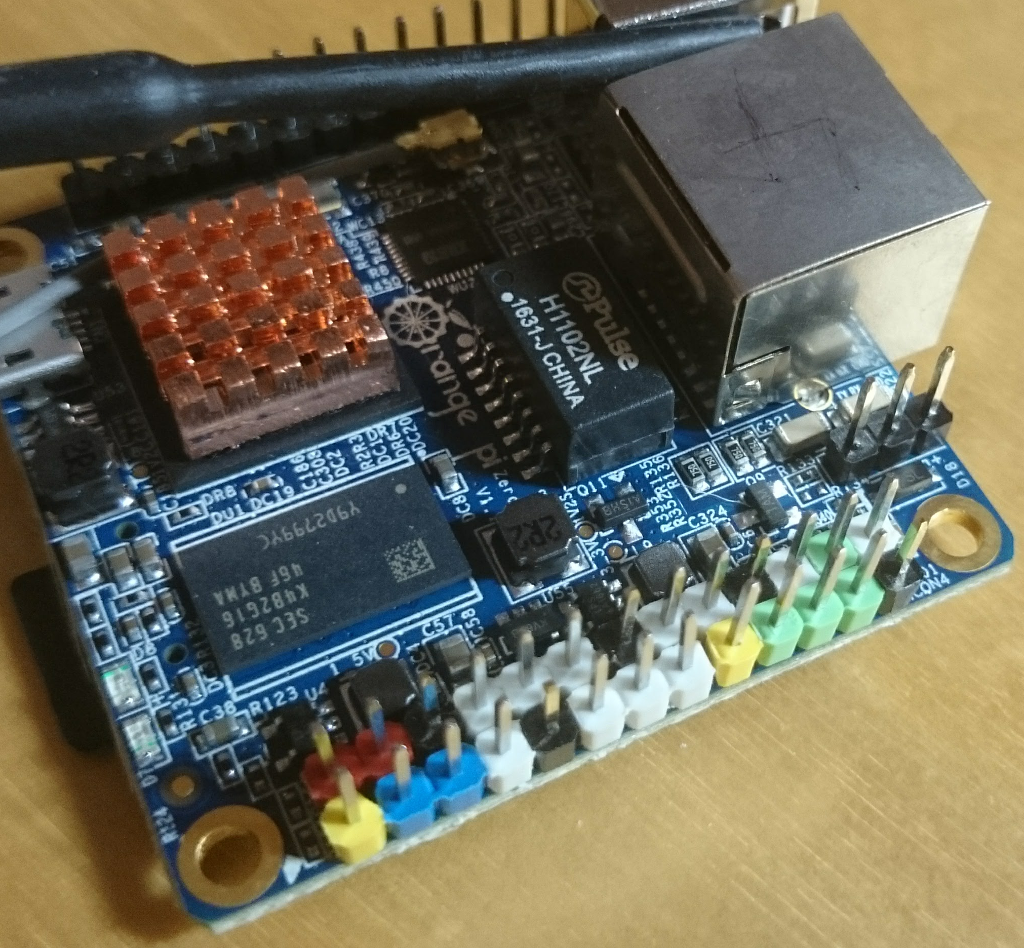
And here is the result:

Red is +5V, yellow is +3.3V, black is GND, blue is I²C and green is SPI. I don use UARTs a lot, so I did not bother to colour those.

Took about 15min of work incl. soldering. Totally worth it.

Mar 052017
 
Espruino, ESP8266 and the I2C OLED

Small Sunday afternoon project: Make the ESP8266 with Espruino work with the OLED display I have. NodeMCU has no issues. Time to try Espruino+JavaScript instead of NodeMCU+Lua.

Ingredients:

~/.local/bin/esptool.py --port /dev/ttyUSB0 --baud 115200 write_flash 
--flash_freq 80m --flash_mode qio --flash_size 32m \
 0x0000 "boot_v1.6.bin" \
0x1000 espruino_esp8266_user1.bin \
0x3FC000 esp_init_data_default.bin \
0x37E000 blank.bin
  • and then this little program will use it (if you have configured everything correctly and I2C works as it should):
I2C1.setup({sda: NodeMCU.D2, scl: NodeMCU.D1});

function start(){
 // write some text
 g.drawString("Hello World!",2,2);
 // write to the screen
 g.flip(); 
}

var g = require("SSD1306").connect(I2C1, start, {height:64});


Took me some tries to get it working and very helpful was the ability to scan the I2C bus:

function isDeviceOnBus(i2c,id) {
  try {
    return i2c.readFrom(id,1);
  }
  catch(err) {
    return -1;
  }
}

function detect(i2c,first, last) {
  first = first | 0;
  last = last | 0x77;
  var idsOnBus = Array();
  for (var id = first; id <= last; id++) {
    if ( isDeviceOnBus(i2c,id) != -1) {
      idsOnBus.push("0x"+id.toString(16));
    }
  }
  return idsOnBus;
}

I2C1.setup({sda: NodeMCU.D2, scl: NodeMCU.D1});
console.log('I2C detect as array:',detect(I2C1));

Note that I could not make the Wemos OLED work as its size (64×48) seems not supported. The 128×64 display I have worked out of the box. 128×32 is supposed to work too (see here).


Feb 192017
 
HAProxy, docker-compose and Let's Encrypt

Linode started to offer US$5 VMs and they are available in Tokyo (9ms ping as opposed to 122ms ping to California), so I could not resist to get another one and use it for some experimenting which I simply don’t dare to do on this very blog page (and my wife is using it for work too).


Goal

  • 2 web servers serving web server stuff (a simple static index.html serves here)
  • 3 virtual web addresses:
    • first web server
    • second web server
    • round-robin web server which serves data from the first and second web server
  • Everything with SSL without any warning from web browsers

Ingredients

  • 1 VM with a public IP address
  • 3 FQDNs pointing all to above IP address
    • www1.qw2.org
    • www3.qw2.org
    • www4.qw2.org
  • 2 web servers (www1, www3)
  • 1 load-balancer (www4)
  • 3 certificates for above FQDNs

Let’s Encrypt Certificates

I use acme.sh for my few certificate needs. This is how to get a new certificate issued:

./acme.sh --issue --dns dns_linode --dnssleep 1200 -d www4.qw2.org

This is using the DNS API from Linode (who hosts my DNS records). See more details here. It creates the required TXT record and removes it later again. I found that 1200 seconds wait time works. 900 does not always. I end up using 10 seconds, suspend the acme.sh command (shell ^Z), and use “dig -t TXT _acme-challenge.www4.qw2.org” until it returns some TXT record. Then continue the suspended acme.sh command.

You should then have a new directory www4.qw2.org in your acme.sh directory with those files:

harald@blue:~/.acme.sh$ ls -la www4.qw2.org/ 
total 36 
drwxr-xr-x  2 harald users 4096 Feb 19 10:16 . 
drwx------ 17 harald users 4096 Feb 19 00:26 .. 
-rw-r--r--  1 harald users 1647 Feb 19 10:16 ca.cer 
-rw-r--r--  1 harald users 3436 Feb 19 10:16 fullchain.cer 
-rw-r--r--  1 harald users 1789 Feb 19 10:16 www4.qw2.org.cer 
-rw-r--r--  1 harald users  517 Feb 19 10:16 www4.qw2.org.conf 
-rw-r--r--  1 harald users  936 Feb 19 00:26 www4.qw2.org.csr 
-rw-r--r--  1 harald users  175 Feb 19 00:26 www4.qw2.org.csr.conf 
-rw-r--r--  1 harald users 1675 Feb 19 00:26 www4.qw2.org.key

You’ll need the fullchain.cer and the private key www4.qw2.org.key later.

Repeat for www1 and www3 too.

Note that the secret key is world readable. the .acme.sh directory is therefore secured with 0700 permissions.

Setting up the Web Servers

Using lighttpd herte. The full directory structure:

harald@lintok1:~$ tree lighttpd 
lighttpd 
├── 33100 
│   ├── etc 
│   │   ├── lighttpd.conf 
│   │   ├── mime-types.conf 
│   │   ├── mod_cgi.conf 
│   │   ├── mod_fastcgi.conf 
│   │   ├── mod_fastcgi_fpm.conf 
│   │   └── www1.qw2.org 
│   │       ├── combined.pem 
│   │       └── fullchain.cer 
│   └── htdocs 
│       └── index.html 
├── 33102 
│   ├── etc 
│   │   ├── lighttpd.conf 
│   │   ├── mime-types.conf 
│   │   ├── mod_cgi.conf 
│   │   ├── mod_fastcgi.conf 
│   │   ├── mod_fastcgi_fpm.conf 
│   │   └── www3.qw2.org 
│   │       ├── combined.pem 
│   │       └── fullchain.cer 
│   └── htdocs 
│       └── index.html 
└── docker-compose.yml

Using the lighttpd.conf is simple and can be done in 5 or 10 minutes. The part for enabling https is this:

$SERVER["socket"] == ":443" { 
ssl.engine    = "enable" 
ssl.pemfile   = "/etc/lighttpd/www1.qw2.org/combined.pem" 
ssl.ca-file   = "/etc/lighttpd/www1.qw2.org/fullchain.cer" 
}

fullchain.cer is the one you get from the Let’s Encrypt run. “combined.pem” is created via

cat fullchain.cer www1.qw2.org.key > combined.pem

Here the content of docker-compose.yml:

lighttpd-33100: 
  image: sebp/lighttpd 
  volumes: 
    - /home/harald/lighttpd/33100/htdocs:/var/www/localhost/htdocs 
    - /home/harald/lighttpd/33100/etc:/etc/lighttpd 
  ports: 
    - 33100:80 
    - 33101:443
  restart: always
 
lighttpd-33102: 
  image: sebp/lighttpd 
  volumes: 
    - /home/harald/lighttpd/33102/htdocs:/var/www/localhost/htdocs 
    - /home/harald/lighttpd/33102/etc:/etc/lighttpd 
  ports: 
    - 33102:80 
    - 33103:443
  restart: always

To start those 2 web servers, use docker-compose:

docker-compose up

If you want to have a reboot automatically restart the service, then use do “docker-compose start” afterwards which installs a service.

To test, access: http://www1.qw2.org:33100, https://www1.qw2.org:33101, http://www3.qw2.org:33102, https://www3.qw2.org:33103

They all should work, and the https pages should find a proper security status (valid certificate, no name mismatch etc.).

Adding HAProxy

HAProxy (1.7.2 as of the time of writing) can be the SSL termination and forwarded traffic between the web server and HAProxy is unencrypted (resp. can be encrypted via another method), or HAProxy can simply forward traffic. Which one is preferred depends on the application. In my case it makes most sense to let HAProxy handle SSL.

First the full directory structure:

haproxy 
├── docker-compose.yml 
└── etc 
    ├── errors 
    │   ├── 400.http 
    │   ├── 403.http 
    │   ├── 408.http 
    │   ├── 500.http 
    │   ├── 502.http 
    │   ├── 503.http 
    │   ├── 504.http 
    │   └── README 
    ├── haproxy.cfg 
    └── ssl 
        └── private 
            ├── www1.qw2.org.pem 
            ├── www3.qw2.org.pem 
            └── www4.qw2.org.pem

The www{1,3}.qw2.org.pem were copied from the lighttpd files.

haproxy.cfg:

harald@lintok1:~/haproxy/etc$ cat haproxy.cfg  
global 
        user nobody 
        group users 
        #daemon 
 
        # Admin socket 
        stats socket /var/run/haproxy.sock mode 600 level admin 
        stats timeout 2m 
 
        # Default SSL material locations 
        #ca-base /usr/local/etc/haproxy/ssl/certs 
        #crt-base /usr/local/etc/haproxy/ssl/private 
 
        # Default ciphers to use on SSL-enabled listening sockets. 
        # For more information, see ciphers(1SSL). 
        tune.ssl.default-dh-param 2048 
 
        ssl-default-bind-options no-sslv3 no-tls-tickets 
        ssl-default-bind-ciphers ECDHE-RSA-AES128-GCM-SHA256:ECDHE-ECDSA-AES128-GCM-SHA256:ECDHE-RSA
-AES256-GCM-SHA384:ECDHE-ECDSA-AES256-GCM-SHA384:DHE-RSA-AES128-GCM-SHA256:DHE-DSS-AES128-GCM-SHA256
:kEDH+AESGCM:ECDHE-RSA-AES128-SHA256:ECDHE-ECDSA-AES128-SHA256:ECDHE-RSA-AES128-SHA:ECDHE-ECDSA-AES1
28-SHA:ECDHE-RSA-AES256-SHA384:ECDHE-ECDSA-AES256-SHA384:ECDHE-RSA-AES256-SHA:ECDHE-ECDSA-AES256-SHA
:DHE-RSA-AES128-SHA256:DHE-RSA-AES128-SHA:DHE-DSS-AES128-SHA256:DHE-RSA-AES256-SHA256:DHE-DSS-AES256
-SHA:DHE-RSA-AES256-SHA:AES128-GCM-SHA256:AES256-GCM-SHA384:AES128-SHA256:AES256-SHA256:AES128-SHA:A
ES256-SHA:AES:CAMELLIA:DES-CBC3-SHA:!aNULL:!eNULL:!EXPORT:!DES:!RC4:!MD5:!PSK:!aECDH:!EDH-DSS-DES-CB
C3-SHA:!EDH-RSA-DES-CBC3-SHA:!KRB5-DES-CBC3-SHA 
 
        ssl-default-server-options no-sslv3 no-tls-tickets 
        ssl-default-server-ciphers ECDHE-RSA-AES128-GCM-SHA256:ECDHE-ECDSA-AES128-GCM-SHA256:ECDHE-R
SA-AES256-GCM-SHA384:ECDHE-ECDSA-AES256-GCM-SHA384:DHE-RSA-AES128-GCM-SHA256:DHE-DSS-AES128-GCM-SHA2
56:kEDH+AESGCM:ECDHE-RSA-AES128-SHA256:ECDHE-ECDSA-AES128-SHA256:ECDHE-RSA-AES128-SHA:ECDHE-ECDSA-AE
S128-SHA:ECDHE-RSA-AES256-SHA384:ECDHE-ECDSA-AES256-SHA384:ECDHE-RSA-AES256-SHA:ECDHE-ECDSA-AES256-S
HA:DHE-RSA-AES128-SHA256:DHE-RSA-AES128-SHA:DHE-DSS-AES128-SHA256:DHE-RSA-AES256-SHA256:DHE-DSS-AES2
56-SHA:DHE-RSA-AES256-SHA:AES128-GCM-SHA256:AES256-GCM-SHA384:AES128-SHA256:AES256-SHA256:AES128-SHA
:AES256-SHA:AES:CAMELLIA:DES-CBC3-SHA:!aNULL:!eNULL:!EXPORT:!DES:!RC4:!MD5:!PSK:!aECDH:!EDH-DSS-DES-
CBC3-SHA:!EDH-RSA-DES-CBC3-SHA:!KRB5-DES-CBC3-SHA 
 
defaults 
    log     global 
    mode    http 
    option  dontlognull 
    timeout connect 5000 
    timeout client  50000 
    timeout server  50000 
    errorfile 400 /usr/local/etc/haproxy/errors/400.http 
    errorfile 403 /usr/local/etc/haproxy/errors/403.http 
    errorfile 408 /usr/local/etc/haproxy/errors/408.http 
    errorfile 500 /usr/local/etc/haproxy/errors/500.http 
    errorfile 502 /usr/local/etc/haproxy/errors/502.http 
    errorfile 503 /usr/local/etc/haproxy/errors/503.http 
    errorfile 504 /usr/local/etc/haproxy/errors/504.http 
    stats enable 
    stats uri /stats 
    stats realm Haproxy\ Statistics 
    stats auth admin:SOME_PASSWORD 
 
frontend http-in 
    bind *:80 
    acl is_www1 hdr_end(host) -i www1.qw2.org 
    acl is_www3 hdr_end(host) -i www3.qw2.org 
    acl is_www4 hdr_end(host) -i www4.qw2.org 
    use_backend www1 if is_www1 
    use_backend www3 if is_www3 
    use_backend www4 if is_www4 
 
frontend https-in 
    bind *:443 ssl crt /usr/local/etc/haproxy/ssl/private/ 
    reqadd X-Forward-Proto:\ https 
    acl is_www1 hdr_end(host) -i www1.qw2.org 
    acl is_www3 hdr_end(host) -i www3.qw2.org 
    acl is_www4 hdr_end(host) -i www4.qw2.org 
    use_backend www1 if is_www1 
    use_backend www3 if is_www3 
    use_backend www4 if is_www4 
 
backend www1 
    balance roundrobin 
    option httpclose 
    option forwardfor 
    server s1 www1.qw2.org:33100 maxconn 32 
 
backend www3 
    balance roundrobin 
    option httpclose 
    option forwardfor 
    server s3 www3.qw2.org:33102 maxconn 32 
 
backend www4 
    balance roundrobin 
    option httpclose 
    option forwardfor 
    server s4-1 www1.qw2.org:33100 maxconn 32 
    server s4-3 www3.qw2.org:33102 maxconn 32 
 
listen admin 
    bind *:1936 
    stats enable 
    stats admin if TRUE

Replace “SOME_PASSWORD” with an admin password for the admin user who can stop/start backends via the Web UI.

Here the docker-compose.yml file to start HAProxy:

harald@lintok1:~/haproxy$ cat docker-compose.yml  
haproxy: 
  image: haproxy:1.7 
  volumes: 
    - /home/harald/haproxy/etc:/usr/local/etc/haproxy 
  ports: 
    - 80:80 
    - 443:443 
    - 1936:1936
  restart: always

To start haproxy, do:

docker-compose up

The Result

Now http://www1.qw2.org as well as https://www1.qw2.org works. No need for specific ports like 33100 or 33101 anymore. Same for www3.qw2.org. www4.qw2.org is a round-robin of www1 and www3, but it’s using the www4 certificate when using https. In all cases HAProxy terminates the SSL connections and it’s presenting the correct certificates.

Related: on http://www4.qw2.org:1936/haproxy?stats you can see the statistics of HAProxy.

Connecting it all all

Running 2 web servers plus the load-balancer with all of them internally connected and only the load-balancer visible on port 80 resp. 443 needs a new docker-compose.yml (changed to version 3 syntax) and a slight matching change haproxy.conf file:

harald@lintok1:~/three$ cat docker-compose.yml 
version: '3' 
 
services: 
  lighttpd-33100: 
    image: sebp/lighttpd 
    volumes: 
      - /home/harald/lighttpd/33100/htdocs:/var/www/localhost/htdocs 
      - /home/harald/lighttpd/33100/etc:/etc/lighttpd 
    expose: 
      - 80 
    restart: always 
 
  lighttpd-33102: 
    image: sebp/lighttpd 
    volumes: 
      - /home/harald/lighttpd/33102/htdocs:/var/www/localhost/htdocs 
      - /home/harald/lighttpd/33102/etc:/etc/lighttpd 
    expose: 
      - 80 
    restart: always 
 
  haproxy: 
    image: haproxy:1.7 
    volumes: 
      - /home/harald/three/haproxy/etc:/usr/local/etc/haproxy 
    ports: 
      - 80:80 
      - 443:443 
      - 1936:1936 
    restart: always

No need for lighttpd to handle SSL anymore (no more port 443 needed to be exposed at all). Only the HAProxy is visible from outside. Small changes are needed on haproxy.conf, but only in the backend section:

[...]
backend www1 
    balance roundrobin 
    option httpclose 
    option forwardfor 
    server s1 lighttpd-33100:80 maxconn 32 
 
backend www3 
    balance roundrobin 
    option httpclose 
    option forwardfor 
    server s3 lighttpd-33102:80 maxconn 32 
 
backend www4 
    balance roundrobin 
    option httpclose 
    option forwardfor 
    server s4-1 lighttpd-33100:80 maxconn 32 
    server s4-3 lighttpd-33102:80 maxconn 32
 [...]

And with “docker ps” we can see what’s happening under the hood of docker-compose:

harald@lintok1:~/three$ docker ps 
CONTAINER ID        IMAGE               COMMAND                  CREATED             STATUS         
     PORTS                                                              NAMES 
742a2e5388f2        sebp/lighttpd       "lighttpd -D -f /e..."   4 minutes ago       Up 3 minutes   
     80/tcp                                                             three_lighttpd-33100_1
9d4c61e6c162        sebp/lighttpd       "lighttpd -D -f /e..."   4 minutes ago       Up 3 minutes   
     80/tcp                                                             three_lighttpd-33102_1 
2e41dfa26ac9        haproxy:1.7         "/docker-entrypoin..."   4 minutes ago       Up 3 minutes   
     0.0.0.0:80->80/tcp, 0.0.0.0:443->443/tcp, 0.0.0.0:1936->1936/tcp   three_haproxy_1 


Jan 092017
 

One problem for using HTTPS was in the past that sharing DNS names with one web server was not supported. HTTP can handle this for longer.

However HTTPS also supports virtual HTTPS servers: SNI does that.

And here is how to use it with HAProxy:

frontend https-in 
        bind *:443 ssl crt /etc/haproxy/ssl/private/ 
        reqadd X-Forward-Proto:\ https 
        acl is_site1 hdr_end(host) -i www1.qw2.org 
        acl is_site2 hdr_end(host) -i www2.qw2.org 
        use_backend site1 if is_site1 
        use_backend site2 if is_site2

All the magic is in the bind line where a directory with PEM certificates (concat of fullchain.cer and the key)

Now you can have https for everything and HAProxy will handle all the secure connectivity for you.

Jan 092017
 

To run boxbackup on a system which uses systemd, use this little systemd service file (taken from here and modified for Ubuntu):

# /etc/systemd/system/boxclient.service
# This service file runs an Box Backup daemon that runs backups on demand.

[Unit]
Description=Box Backup Client
Wants=network.target
After=network.target

[Service]
ExecStart=/usr/bin/bbackupd -F -c /etc/boxclient/bbackupd.conf
KillMode=process
Restart=always

[Install]
WantedBy=multi-user.target

Enable and start via

systemctl enable boxclient.service
systemctl start boxclient.service

 Posted by at 17:40  Tagged with:
Dec 182016
 
Orange Pi Zero - I/O

I finally figured out how to do simple I/O on the GPIO pins on the Orange Pi Zero. It’s actually the same as Raspberry Pi and it relies on /sys/class/gpio/

Most important: Use Armbian, and I in particular use 3.4.113 (legacy).

GPIO


Linux GPIO SOC Label CON4 CON4 Label SOC Linux GPIO
Vcc3V3-EXT 1 2 DCIN-5V
12 PA12 TWI0-SDA 3 4 DCIN-5V
11 PA11 TWI0-SCK 5 6 GND
6 PA6 PWM1 7 8 UART1_TX PG6 198
GND 9 10 UART1_RX PG7 199
1 PA1 UART2_RX 11 12 PA7 PA7 7
0 PA0 UART2_TX 13 14 GND
3 PA3 UART2_CTS 15 16 TWI1-SDA PA19  19
VCC3V3-EXT 17 18 TWI1-SCK PA18 18
15 PA15 SPI1_MOSI 19 20 GND
16 PA16 SPI1_MISO 21 22 UART2_RTS PA2 2
14 PA14 SPI1_CLK 23 24 SPI1_CS PA13 13
GND 25 26 PA10 PA10?

Note: PA10 does not seem to work.


To enable one GPIO pin, do this as root:

echo 7 >/sys/class/gpio/export
chmod a+rw /sys/class/gpio/gpio7/*

Now in NodeJS you can do (as non-root):

var Gpio = require('onoff').Gpio, 
  led = new Gpio(7, 'out'); 
 
function blinkled7() { 
  var state=false; 
  return function () { 
    console.log(state); 
    if (state) led.writeSync(0) 
    else led.writeSync(1); 
    state = ! state; 
    } 
} 
 
f=blinkled7(); 
setInterval(f, 1000);

which blinks GPIO pin 7 (AKA PA7). You can also watch pins:

var Gpio = require('onoff').Gpio,
  led = new Gpio(7, 'out'),
  button = new Gpio(16, 'in', 'both');

button.watch(function (err, value) {
  if (err) {
    throw err;
  }
  console.log("Changing to ", value);
  led.writeSync(value);
});

process.on('SIGINT', function () {
  console.log("Leaving...");
  led.unexport();
  button.unexport();
});

which makes the LED match what PA16 is. If you connect PA16 to e.g. PA6, you can change PA6, which is detected by PA16 which is reflected in the LED change on PA7!


LED’s

The 2 on-board LED’s can be controlled via

echo [0|1] > /sys/class/leds/[red|green]_led/brightness

which map to PA17 (red) and PL10 (green), but those are (of course) claimed by the LED driver.

PWM

Not figured out yet.