Aug 262017
 
Crunchzilla, German and Japanese

Recently for an initiative of my workplace I was looking for a programming course for children. Think “Hour of Code”, but make that 3 hours and “real” programming. “Real” programming means: typing code and getting potentially syntax errors. Target age bracket was 11-14 years old (Junior High School in Japan).

http://www.crunchzilla.com/code-monster looked by far best, however we are in Japan and children don’t need to be distracted with English when learning something new like JavaScript. So I extended the code to include more languages (German first as I can handle all aspects of it, but the main target was Japanese). The code was the easy part. The text and explanations were a lot of work. I’d guess 40h for German, but easily double that for Japanese since you have to watch out to use Kanjis which the children of that age were taught. Thanks for the Japanese translation go to my coworkers and for my wife who all contributed.

Well, it’s done and it was a success: children liked it and it worked flawlessly. The forked repo is here and if you are impatient, you can learn it directly from this link.

Greg was kind enough to merge my changes, so anyone can now relatively painlessly add more languages.


Jun 262017
 

Reading all this nice stuff about TDD. Using the Espruino GUI suddenly feels limiting. It’s great for testing and small things less than 1000 lines, but once you want modules and testing, it fails as it’s simply not made for that.

But there’s a fix, at least for me: https://github.com/haraldkubota/esp32

In short:

  • browserify to make a single JavaScipt file out of modules
  • Jest for testing
  • make to bundle it all together (ok, I do use npm too, but make it nicer IMHO)
  • netcat to upload the code

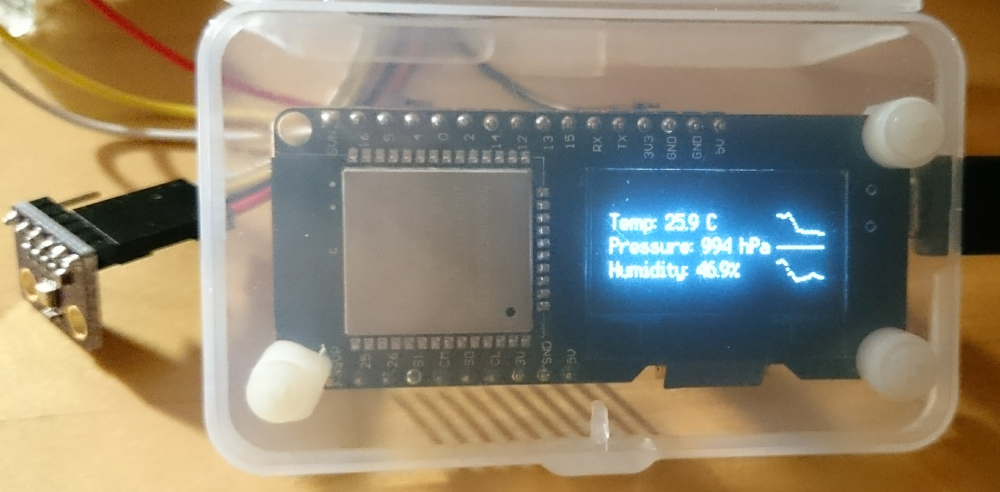
ESP32 with BME280, showing its measured data with sparklines

The sparkline as well as the circular buffer code it uses was attempted to be written via TDD. I think I failed partially here, but I still have plenty tests. When restructuring the code I was happy about the tests as they confirmed all is still working! Hooray for tests!

Jun 042017
 
Google Cloud, Authentication, Storage and NodeJS

How to use Cloud Storage from NodeJS? It’s actually easy once you found the libraries to use and a sample which works. But finding this was a long journey which took most of a day. Here was the most useful article of Sebastien having had the same problem. Shortly later I found this: https://googlecloudplatform.github.io/google-cloud-node/#/docs/storage/1.1.0/storage which helped a lot.

The short summary here in the hope that someone might read this and get a simple working example of NodeJS+Google Cloud Storage.

Pre-Requisite: Access

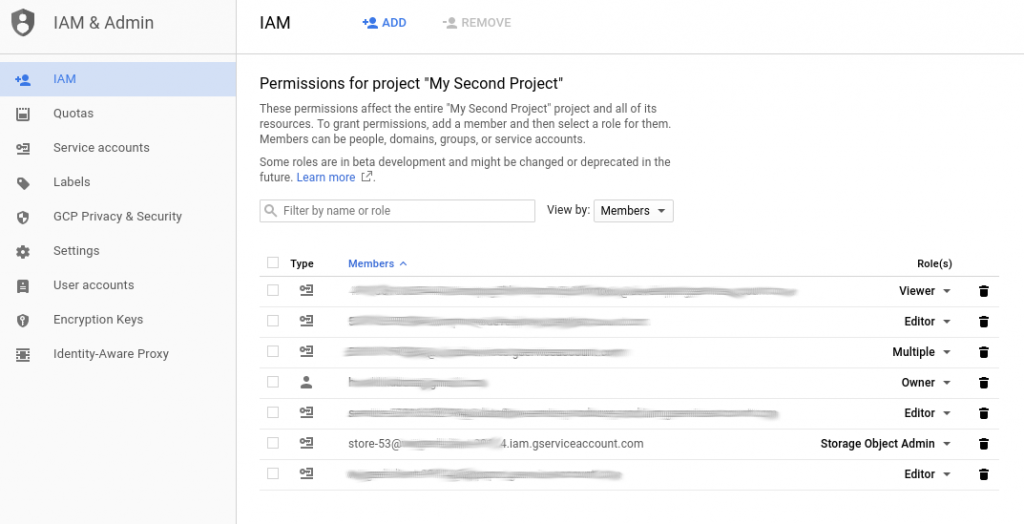
On the Google Cloud Console, go to IAM & Admin, create a Service Account, and create a key for it. Keep this key. It’s the JSON key in the keyFilename. This plus the projectID plus permissions is all you need to get access.

Under IAM you change the role of the new service account to Storage Admin to see all buckets. if you only want to connect to one bucket, use Storage Object Admin. Or less depending on what you need.

BTW updating permissions is almost instantly.

Task 1: See Buckets

This is the NodeJS program running on my home PC. I split it into 3 parts, but it’s really one file

The service accounts needs Storage Object Admin permississions for this.

var gcs = require('@google-cloud/storage')({
 projectId: 'some-thing-12345',
 keyFilename: './KEY.json'  // absolute path ok too
});
// GOOGLE_APPLICATION_CREDENTIALS=$keyFilename was not needed
// contrary to some documentation

gcs.getBuckets(function(err, buckets) {
 if (!err) {
  buckets.forEach(function(value){
  console.log("name: "+value.metadata.name);
  console.log("location: "+value.metadata.location);
  }); 
 } else {
  console.log(err);
 }
});

2. Look Inside Buckets

Service account needs Storage Object Viewer (read-only) resp. Creator (read/write).

// List contents of bucket 'some-test-1'

var wt1 = gcs.bucket('some-test-1');

wt1.getFiles(function(err, files) {
 if (!err) {
  files.forEach(x=>{console.log("Name: "+x.name)});
  // files is an array of File objects.
 } else {
  console.log(err);
 }
});

3. Access Files in a Bucket

Service account needs Storage Object Viewer (read-only) resp. Creator (read/write)

// Download a file (resp. create a read-stream)

var fs = require('fs');
var remoteFile = wt1.file('f1/a1.sh');
var localFilename = 'test-a1.sh';

remoteFile.createReadStream()
 .on('error', function(err) {
  console.log(err);
  })
 .on('response', function(response) {
 // Server connected and responded with the specified status and headers.
  })
 .on('end', function() {
  // The file is fully downloaded.
  })
 .pipe(fs.createWriteStream(localFilename));


May 212017
 

ESP8285

Espruino does not need more than 1 MB of Flash memory, so using a single chip solution with 1 MB Flash integrated like the ESP8285 seesm to be a sensible choice. And it works with Espruino just like the ESP8266 does.

The only special part is how to flash it:

esptool.py --port /dev/ttyUSB0 --baud 115200 write_flash \
--flash_mode dout --flash_size 8m \
0x0000 boot_v1.6.bin \
0x1000 espruino_esp8266_user1.bin \
0xFC000 esp_init_data_default.bin 0xFE000 blank.bin

There’s no difference when it comes to save(): only very small programs can be saved. I hope the ESP32 is better in this regard.

Mar 252017
 
STM32F4 Discovery and Espruino

Some time ago I installed Espruino on the STM32F4 Discovery board.

Here my notes:

sudo aptitude install cmake libusb-1.0-0-dev
git clone https://github.com/texane/stlink.git
cd stlink
cmake .
make
# install into /usr/local/
sudo make install
sudo ldconfig -v

How you should be able to see the STM32F4 Discovery board:

$ sudo st-info --probe 
Found 1 stlink programmers 
 serial: 563f6b06493f51521236213f 
openocd: "\x56\x3f\x6b\x06\x49\x3f\x51\x52\x12\x36\x21\x3f" 
  flash: 1048576 (pagesize: 16384) 
   sram: 196608 
 chipid: 0x0413 
  descr: F4 device

and now flash:

 
$ sudo st-flash write espruino_1v91_stm32f4discovery.bin 0x08000000                                
st-flash 1.3.1-11-g78ced6a 
2017-03-25T20:41:03 INFO src/common.c: Loading device parameters.... 
2017-03-25T20:41:03 INFO src/common.c: Device connected is: F4 device, id 0x10016413 
2017-03-25T20:41:03 INFO src/common.c: SRAM size: 0x30000 bytes (192 KiB), Flash: 0x100000 bytes (1024 KiB) in pages of 16
384 bytes 
2017-03-25T20:41:03 INFO src/common.c: Attempting to write 298872 (0x48f78) bytes to stm32 address: 134217728 (0x8000000) 
Flash page at addr: 0x08040000 erasedEraseFlash - Sector:0x6 Size:0x20000  
2017-03-25T20:41:09 INFO src/common.c: Finished erasing 7 pages of 131072 (0x20000) bytes 
2017-03-25T20:41:09 INFO src/common.c: Starting Flash write for F2/F4/L4 
2017-03-25T20:41:09 INFO src/flash_loader.c: Successfully loaded flash loader in sram 
enabling 32-bit flash writes 
size: 32768 
size: 32768 
size: 32768 
size: 32768 
size: 32768 
size: 32768 
size: 32768 
size: 32768 
size: 32768 
size: 3960 
2017-03-25T20:41:13 INFO src/common.c: Starting verification of write complete 
2017-03-25T20:41:16 INFO src/common.c: Flash written and verified! jolly good!

How you should be able to see the STM32F4 Discovery board:

And here a small program which reads out the accelerometer LIS302DL and the most upper LED will be lit up. Be aware that on newer F4 Discovery boards this model has changed to LIS3DSH, which is not compatibel.

function onInit() {
 SPI1.setup({sck: A5, miso:A6, mosi:A7});
 SPI1.send([0x20,0b01000111], E3);
}

var avrx=0.0, avry=0.0;
function getAcc() {
  var accx = SPI1.send([0xA9,0], E3)[1];
  var accy = SPI1.send([0xAB,0], E3)[1];
  if (accx>127) accx-=256;
  if (accy>127) accy-=256;
  avrx = 0.1*accx + 0.9*avrx;
  avry = 0.1*accy + 0.9*avry;
  digitalWrite(LED1, avrx > 32);
  digitalWrite(LED4, avrx < -32);
  digitalWrite(LED2, avry > 32);
  digitalWrite(LED3, avry < -32);
}
onInit();setInterval(getAcc, 10);

Mar 202017
 

Bluetooth and its LE variant are new areas for me and, but the learning curve is not too steep thanks to Puck.js. Making  it do what I want is not easy though since I don’t know what it can do.

The most important documents are:

Here an example:

// Have a service to show temperature and battery level
// This is only visible when you are connecting to the Puck

var currentTemperature=E.getTemperature().toFixed(2)*100;

console.log("Temp: "+currentTemperature);

NRF.setServices({
 0x1809 : { // Health Thermometer
  0x2A6E: { // Temperature
   readable: true,
   notify: true,
   value : [ currentTemperature % 256, currentTemperature / 256 ]
  }
 },
 0x180f : { // Battery Level
  0x2a19 : { // Percentage
   readable : true,
   notify: true,
   value: [ Puck.getBatteryPercentage() ],
  }
 }
});

// Updating the temperature

setInterval(function() {
 currentTemperature += 1; // For debugging: increase temp by 0.01 degree per update
 NRF.updateServices({
  0x1809 : {
   0x2A6E : {
    value : [ currentTemperature % 256, currentTemperature / 256 ],
    notify: true
   }
  }
 });
}, 2000);

Mar 052017
 
Espruino, ESP8266 and the I2C OLED

Small Sunday afternoon project: Make the ESP8266 with Espruino work with the OLED display I have. NodeMCU has no issues. Time to try Espruino+JavaScript instead of NodeMCU+Lua.

Ingredients:

~/.local/bin/esptool.py --port /dev/ttyUSB0 --baud 115200 write_flash 
--flash_freq 80m --flash_mode qio --flash_size 32m \
 0x0000 "boot_v1.6.bin" \
0x1000 espruino_esp8266_user1.bin \
0x3FC000 esp_init_data_default.bin \
0x37E000 blank.bin
  • and then this little program will use it (if you have configured everything correctly and I2C works as it should):
I2C1.setup({sda: NodeMCU.D2, scl: NodeMCU.D1});

function start(){
 // write some text
 g.drawString("Hello World!",2,2);
 // write to the screen
 g.flip(); 
}

var g = require("SSD1306").connect(I2C1, start, {height:64});


Took me some tries to get it working and very helpful was the ability to scan the I2C bus:

function isDeviceOnBus(i2c,id) {
  try {
    return i2c.readFrom(id,1);
  }
  catch(err) {
    return -1;
  }
}

function detect(i2c,first, last) {
  first = first | 0;
  last = last | 0x77;
  var idsOnBus = Array();
  for (var id = first; id <= last; id++) {
    if ( isDeviceOnBus(i2c,id) != -1) {
      idsOnBus.push("0x"+id.toString(16));
    }
  }
  return idsOnBus;
}

I2C1.setup({sda: NodeMCU.D2, scl: NodeMCU.D1});
console.log('I2C detect as array:',detect(I2C1));

Note that I could not make the Wemos OLED work as its size (64×48) seems not supported. The 128×64 display I have worked out of the box. 128×32 is supposed to work too (see here).


Nov 062016
 

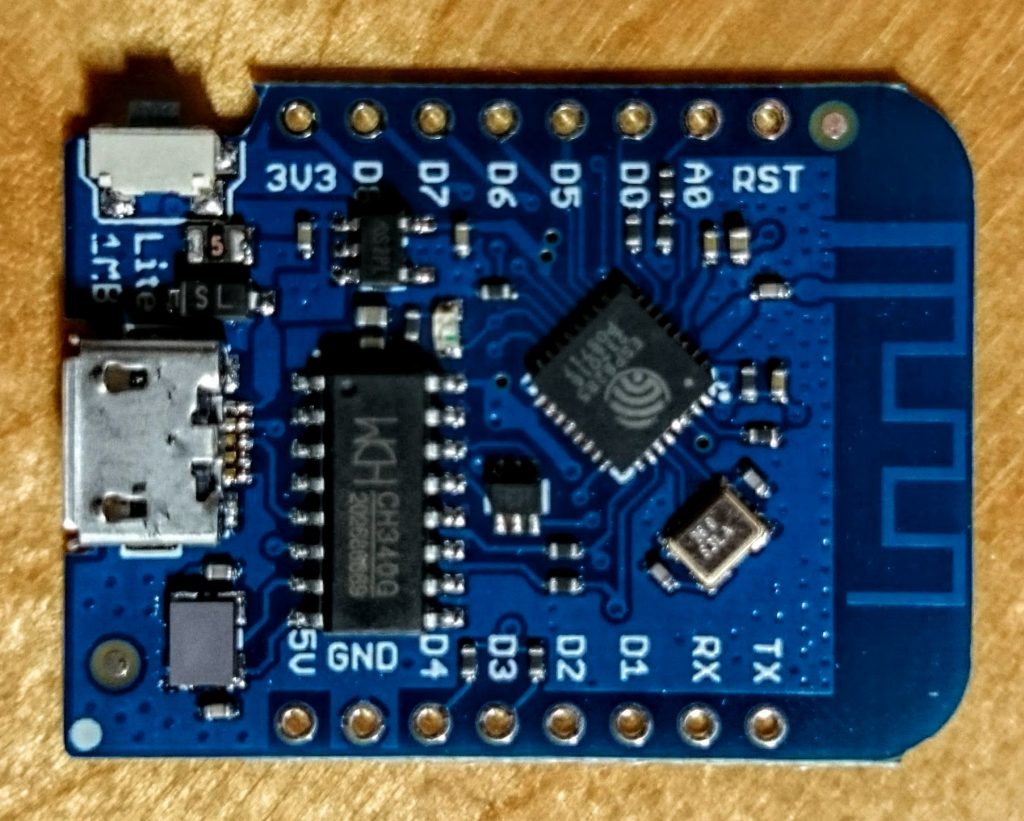
During today’s Dev Japan Meetup I finally had the time to do something I always wanted to do but never had time to implement: Create a fast link from an end-device (AKA browser or phone application) to my LED display. That display is a simple 10×10 WS2812 LEDs strip originally connected to an Arduino with a Bluetooth receiver, but replaced by a Wemos D1 mini flashed with Espruino since that has WiFi and more RAM.

Here the important (but incomplete) part of the Espruino program:

var host = "the_ws_server.co.jp";
var WebSocket = require("ws");
var ws = new WebSocket(host,{
  path: '/',
  port: 8080, // default is 80
  protocol : "echo-protocol", // websocket protocol name (default is none)
  protocolVersion: 13, // websocket protocol version, default is 13
  origin: 'Espruino',
  keepAlive: 60
});

ws.on('open', function() {
  console.log("Connected to server");
});

ws.on('message', function(msg) {
  console.log("MSG: " + msg);
  if (msg == "R") {
    colorize(40, 10, 10);
  } else if (msg == "G") {
    colorize(10, 40, 10);
  } else if (msg == "B") {
    colorize(10, 10, 40);
  }
  esp8266.neopixelWrite(NodeMCU.D4, leds);
});

The logic is as simple as it looks: connect to a WS server and wait for incoming messages. If it’s “R”, or “G”, or “B”, then colorize the LED array.

Here a section of the browser part:

var ws = new WebSocket("ws://the_ws_server.co.jp:8080/");

ws.onopen = function(evt) {
  var conn_status = document.getElementById('conn_text');
  ws.send(JSON.stringify({"join":"led"}));
};

ws.onmessage = function(evt) {
  var newMessage = document.createElement('p');
  newMessage.textContent = "Server: " + evt.data;
  document.getElementById('messages_txt').appendChild(newMessage);
};

ws.onclose = function(evt) {
  alert ("Connection closed");
};

$(".color").click(function(evt) {
  console.log($(this).attr("val"));
  ws.send(JSON.stringify({"room":"led","msg":$(this).attr("val")}));
});

and the buttons look like

<button type="submit" class="color" val="R">Red</button>
<button type="submit" class="color" val="G">Green</button>
<button type="submit" class="color" val="B">Blue</button>

The one missing part is the websocket server in the middle which relays messages, which I took quite literally from here from the Espruino Websocket docs.

This is anything but clean code, and not yet a complete and instructive example application, but it’s the first step and a good proof-of-concept.

Next step is a web page to have a 10×10 grid of buttons which can be turned on/off by touching, and the corresponding commands are sent to the LED display.

Oct 302016
 

Previously I made LEDs on/off via Lua. The pin-order was 4, 3, 2, 1, 5, 0, 6, 7, 8 in NodeMCU: 6 red LEDs, and a RGB LED.

Using Espruino (specifically version 1.87), the order turns out to be: D2, D0, D4, D5, D14, D16?, D12, D13, D15. D1 seems to turn the WiFi LED on/off, which is a bit odd.


Update:

Espruino has a nice feature to convert NodeMCU pins into Espruino pins:

for (var i=1; i<11; ++i) { console.log(NodeMCU["D"+i])}
D5
D4
D0
D2
D14
D12
D13
D15
D3
D1

Or easier, just use NodeMCU.D1 for what was D1 in NodeMCU. It also helps to know that the Espruino numbers are simply the GPIO numbers of the ESP8266 (Espruino D5 = ESP8266 GPIO 14 = NodeMCU D1)

Oct 302016
 

Lua is neat, but learning Lua and JavaScript and NodeJS. Although Lua and especially NodeMCU is similar (not only in name) to NodeJS, it would be nicer to use only one language.

Here the recipe:

  1. Download espruino_1v87.tve_master_b3dc05b_esp8266.tgz
  2. Write flash (note: might use 80m and qio, but my old one does dio):
    ./esptool.py --port /dev/ttyUSB0 --baud 115200 write_flash --flash_freq 40m --flash_mode dio --flash_size 32m \
    0x0000 ~/Downloads/espruino_1v87.tve_master_b3dc05b_esp8266/boot_v1.6.bin \
    0x1000 ~/Downloads/espruino_1v87.tve_master_b3dc05b_esp8266/espruino_esp8266_user1.bin \
    0x3FC000 ~/Downloads/espruino_1v87.tve_master_b3dc05b_esp8266/esp_init_data_default.bin \
    0x37E000 ~/Downloads/espruino_1v87.tve_master_b3dc05b_esp8266/blank.bin
  3. Verify it:
    ./esptool.py --port /dev/ttyUSB0 --baud 115200 verify_flash \
    0x1000 ~/Downloads/espruino_1v87.tve_master_b3dc05b_esp8266/espruino_esp8266_user1.bin \
    0x3FC000 ~/Downloads/espruino_1v87.tve_master_b3dc05b_esp8266/esp_init_data_default.bin \
    0x37E000 ~/Downloads/espruino_1v87.tve_master_b3dc05b_esp8266/blank.bin
  4. Connect at 115200bps.
  5. Connect to your AP:
    var wifi = require("Wifi");
    wifi.connect("your_sid", {password:"your_password"}, function(err){
     console.log("connected? err=", err, "info=", wifi.getIP());
    });
    wifi.stopAP();
    wifi.save();
  6. In the Espruino IDE add the IP address
  7. When you reconnect via Espruino IDE, you should now have 2 choices: serial or TCP/IP via WLAN