Jan 312016
 
Mele F10-Pro

When looking at devices like Minix Neo U1 or similar ones, a keyboard/mouse is needed and I was looking around what’s available.

So I got myself a Mele F10-Pro to test out if this is usable and better than a keyboard with a mouse pad (like this). The F10-Pro emulates a keyboard and a mouse and as a special function it’s also a USB sound device (speaker and microphone) to use e.g. for VoIP.

A test and other ones I found made it looks reasonably well working as a mouse pointer replacement and the added keyboard on the back replaces the occasional text to type. Just flip it around and type.

Well, it’s not perfect, but it’s still good:

  • The air mouse part (mouse pointer) works well. It’s using relative coordinates for moves. Just like a mouse. The Wii Remote is an absolute device thanks to the “sensor bar” it uses. This is significantly better as pointing to the screen always result in the same mouse pointer position. But one can get used to it.
  • Sound works. It was immediately recognized on Linux.
  • The rubber keys are a bit hard to push (meaning that the mouse pointer will move if you are not careful), but you know when you pushed a key. It has nice tactile feedback.
  • To type, just flip the thing around. The mouse feature stops to work then. Hitting the “mouse keys” on the keyboard (upper left and right) now moves the mouse and allows you to type. To go back to type-only hit the game controller button. In most cases it does not matter if the mouse moves, but if you use X11 with focus-follows-mouse, it’s mandatory to turn the mouse part off while typing.
  • The USB transceiver is small: 2.5cm stick out. The old version was huge.

The F10-Pro has minor problems too:

  • When flipping to type, the mouse gets disabled. That’s good. But it does not get re-enabled when flipping back. That’s not good.
  • The plastic is glossy black. Leaves finger prints all over the place.
  • You need light to use either side: Using the keyboard in the dark is at best difficult. The other side is not much better with the exception of the round circle (left/right/up/down) and its center button (left mouse button).
  • The keyboard layout is ok for occasional text. Don’t think about using it for an extensive typing session though. After pushing the blue Fn button, all keys return their secondary function (e.g. the “e” key returns a “3”) until you push the Fn button again.
  • There is no Tab key. And no Ctrl and no Shift or Alt.
  • Caps does not work, but I am not sure it ever worked or it broke or something else is wrong. I’ll have to disassemble the remote to see what’s going on.
  • The power on/off button is the only one which uses the IR LED. I wonder what devices it can turn on/off…

All in all, for about 3500 Yen I rate this as a good buy (if caps would work that is). The main functions (air mouse, a bit of typing) work well. Don’t use it as a mouse replacement for a normal desktop PC, but for hitting large buttons on a TV for KODI it’s good.

I considered the F10-Deluxe air mouse too, as it can do more IR things (learn codes for one), but the Pro has the audio part which I thought is neat for my Banana Pi which has no speakers.

Jan 272016
 
Mirroring Web Pages

Related to the previous article step 1 of a resilient WordPress setup is to mirror the web page somehow. A 2nd WordPress with file level synchronization of the WordPress directory and MySQL multi-master replication sounds great…not.

WordPress keeps files in its directory tree (YAPB pictures as examples, and plugins) and while rsync could handle this, it gets messy quickly. Multi-master MySQL is possible. Overkill for my purpose though.

The easier and more universal way would be to simply grab the web page and keep a static content available. While it’s missing the ability to log in and edit/write articles, that’s fine as most readers will simply read.

The initial idea was to use wget, however that failed a bit: at first it did not (by default) copy JavaScript pages in <script> tags, and it did not download CSS files either, so the pure text contents plus some formatting was copied, but not enough to make it a “mirror”. Another idea was to use PhantomJS to copy and render a picture of the web page. But for a blog that would be a quite long picture, so that idea was thrown out quickly. Going back to the wget method I found httrack, and while not perfect on the first try, httrack made a much better copy out-of-the-box, and with a bit of tuning I could mirror my blog page quite well. While there are differences visible, they are minimal. So httrack it was.

Naturally this became a Docker container. It’s hosted on Docker Hub under hkubota/webmirror.

The Dockerfile is simple:

FROM debian:8 
MAINTAINER Harald Kubota <[email protected]> 
RUN apt-get update ; apt-get -y install lighttpd wget curl openssh-client ; apt-get clean 
# httrack in usr/local/ 
COPY usr/ /usr/ 
RUN ldconfig -v 
# The script to run 
COPY mirror.sh /root/ 
# The lighttpd configuration 
COPY lighttpd.conf /root/ 
ENTRYPOINT ["dumb-init", "/root/mirror.sh"] 
# It's a web server, so expose port 80 
EXPOSE 80 
WORKDIR /root

It’s using mainly httrack which I compiled from sources, and lighttpd as a web server since I need to export the web pages via a web server again. wget, curl and openssh-client are more for completeness as I was testing with httrack and wget and ssh’ing out.

I tested it on several other web pages (www.heise.de, www.theregister.co.uk and some other ones) and it works quite well. Note that defaults are 2 recursive levels, which allow for anything to be clickable on the first page. Also after 5min the copying stops as I had endless loops happening sometimes. If your network bandwidth is very fast or slow, you might have to adjust this.

To run the hkubota/webmirror Docker image, do:

docker run -e web_source="http://www.heise.de/" -e recursive=2 -e refresh=24
 max_time=300 -e other_flags="-v" -p 80:80 -d hkubota/webmirror

If you want to watch what happens (mainly to see httrack output), replace the “-d” by “-it” or watch the logs via “docker logs CONTAINER”.

Next is the actual load balancer…

Jan 242016
 
AWS does not like my Docker :-(

My WordPress/MySQL Docker instances on AWS are unhappy: after some time, they stop. No idea why. All I see is

Failed Units: 1
 polkit.service

when I log in after WordPress seems to have died. And no Docker process is running. While I can restart them easily, it’s annoying to do so manually. At this point I have 2 possibilities: find the root cause, or work around it via monitoring and automatic restarting when needed.

And a load balancer to make the service available even when AWS does kill my Docker containers would be nice. Actually a load balancer has to do monitoring anyway. Since this topic came up at work too, it’s double useful. So a load balancer it is!

A nice article, although a bit dated, is here. He knows what he’s talking about: he made up elastic binary trees and wrote haproxy and made it saturate a 10G link back in 2009.

nginx is a popular http load balancer (amond other things it can do), but since haproxy can do TCP in general, it’s more universally suitable for me, so that’s what it’ll be.

Step 1 is to have something to load balance. Because this is blog runs on WordPress with its MySQL instance, doubling this is non-trivial: WordPress keeps files in its web directory, and the MySQL instanced would need a multi-master replication setup.

Instead I’ll have a static copy of the web page…and then use a load balancer to switch to the static page when the primary is dead.

PS: To be fair AWS might not be at fault here. Truth is: I don’t know what’s causing the problem. On Google Cloud I had no such issue, but that’s about all I can say. I don’t expect problems in the Docker containers as they are quite literally identical. Even the version of CoreOS is identical.

Anyway, this all sounds like a good excuse to set up some load balancing and monitoring.


Jan 172016
 
Banana Pi in a Case

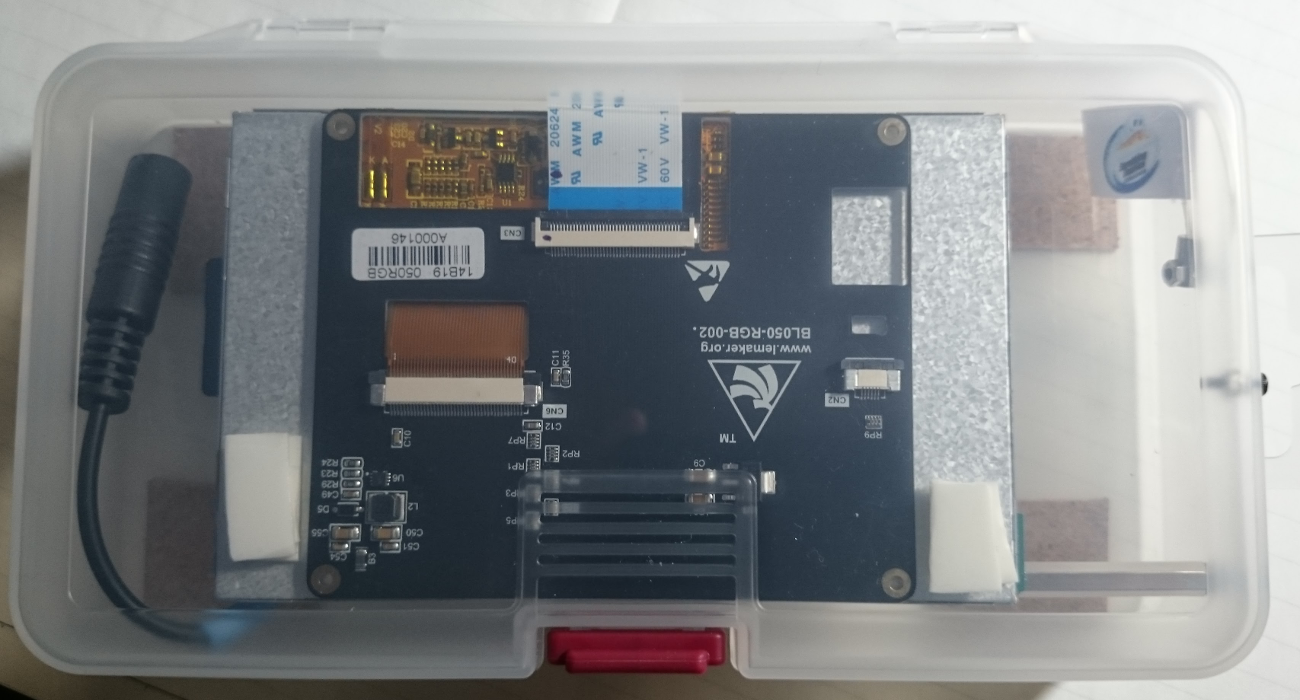
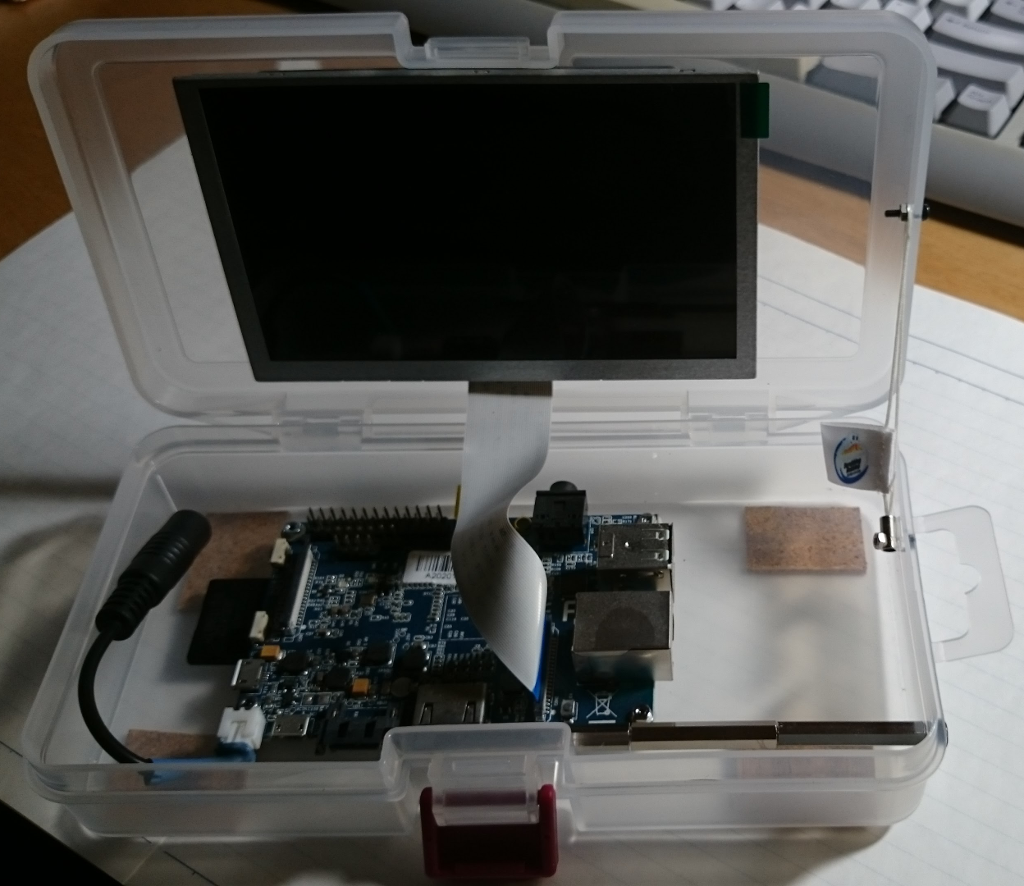
My Banana Pi (AKA BPI, CPU AllWinner A20 @ 1 GHz, 1 GB RAM, 32 GB SD-Card as mass storage) is not fast, but nice to run 24/7. Barely draws power and thus could run on a battery for a while. When I saw this I thought “That’s a nice idea. Let me do that with my BPI too”. I always wanted to put the 5″ LCD somewhere permanent anyway: the LCD and the BPI were loosely connected by this fragile flat cable…it was a question of time when it would break. Unfortunately there is no nice case for both units.

So I searched for a usable case. As flat as possible, as small as possible. With or without space for a battery. I was looking for something made of wood, alas plastic took over the world, so I bought one of those. Not perfect, but the best I could find.

2 problems I had:

  1. How to attach everything inside (BPI and LCD) and what to do about connecting cables. The BPI has connectors on all 4 sides. And the cable to the LCD is not very long.
  2. The case opens completely flat, which would make the screen unreadable as well as it would break the cable. So I had to limit the top cover from opening too much. It’s now set at about 100º.

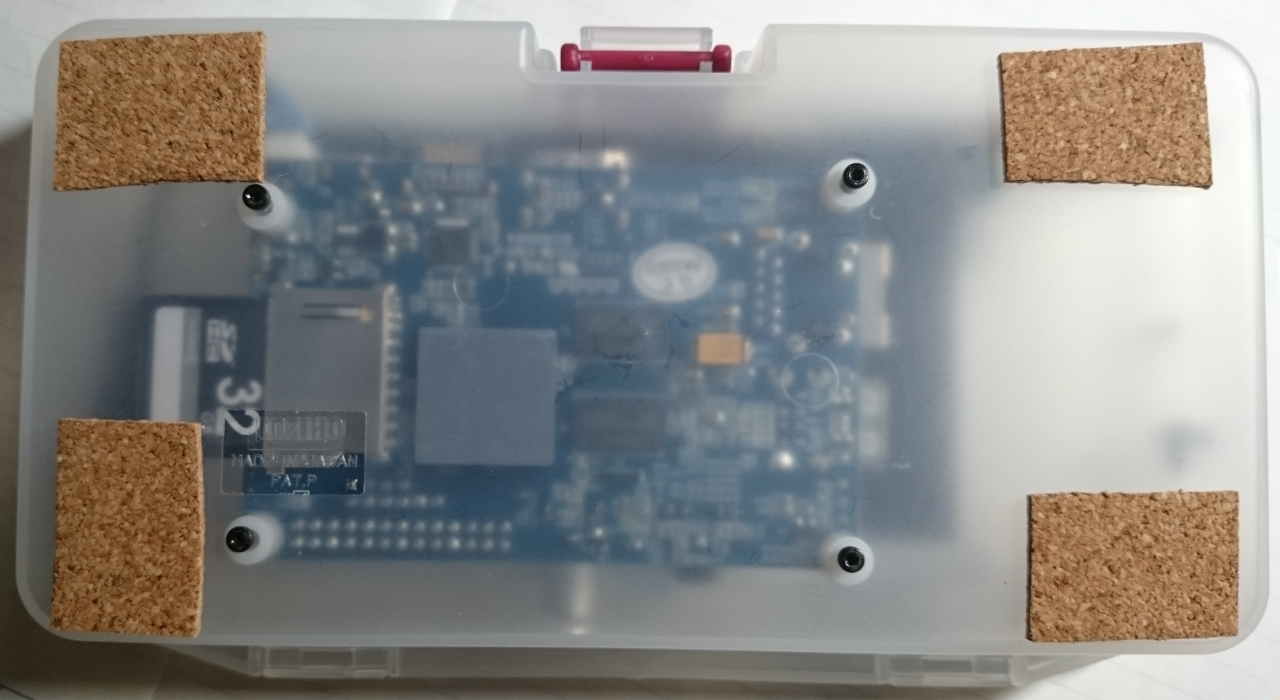
In the end, below you can see how I connected everything.

  • The side of the SD-Card has enough space to remove the card easily.
  • The side of the USB and NIC has enough space to connect normal cables, but many USB sticks are too long
  • Composite video and audio are basically not usable
  • Neither is HDMI and SATA
  • Power connects via barrel connector (alternatively micro-USB, but I don’t use this)

Future improvements:

  • A longer and/or more flexible LCD cable would be nice
  • Being able to connect cables (power, Ethernet) while the case is closed
  • Run via battery. A small 800mAh 7.2V LiPo should last for 4h
  • A custom made case for BPI, LCD, LiPo and charger circuit


Top of the Banana Pi in a case

Top of the Banana Pi in a case

Banana Pi in the box, open

Banana Pi in the box, open

Bottom of the Banana Pi in the box

Bottom of the Banana Pi in the box

 Posted by at 20:23  Tagged with:
Jan 112016
 
Zyx, Windows 10 and PL2303 Driver

When using Windows 10 the driver for the PL2303 inside the USB connection cable for the Zyx, the Zyx software cannot find the COM port. Windows itself might see it. Or it cannot start the device. In all cases the Zyx software cannot find your Zyx.

The tricky part is that with the default Windows driver it finds the PL2303 driver, but it cannot start it. Installing the PL2303 driver from Tarot itself does not help since it’s an older version of the driver.  Windows thus defaults to the newer one. Thus you not only have to install the Tarot USB PL2303 driver, but also select it explicitely in the device manager.

 Posted by at 17:24  Tagged with: ,
Jan 092016
 

Docker has a PID 1 problem: On normal Unix systems his is the init process which does 3 important things (and some more):

  1. Adopt orphans
  2. Reap zombies
  3. Forward signals

There are 2 ways to start processes in a Docker container:

  1. CMD <command> <param1> <param2>…
  2. CMD [“executable”, “param1”, “param2”,…]

In the first case a shell (/bin/sh) runs your program, so PID 1 is /bin/sh. In the 2nd case your executable gets PID 1. Neither is good as neither can do what init normally does.

A fix is to run a proper init system (systemd, SysV init etc.) but that’s way more than you need. A more appropriate fix is to use a simple or dumb init. Like this: https://github.com/Yelp/dumb-init

A nice write-up from the Yelp engineering blog: http://engineeringblog.yelp.com/2016/01/dumb-init-an-init-for-docker.html

Note that this is not needed if

  • Your process runs as PID 1 and does not spawn new processes or
  • Your containers live short so that the volume of potential zombie processes won’t matter and
  • you don’t write any data so a sudden SIGTERM from Docker won’t cause issues with data consistency
Jan 022016
 
Docker Backup

I changed slightly the way to start my containers. Now they always contain the backup volume too:

docker run --name blog-mysql -v blog-backup:/backup \
-v blog-mysql-data:/var/lib/mysql -d mysql/mysql-server:5.7
docker run --name blog-app -v blog-backup:/backup \
-e WORDPRESS_DB_PASSWORD=DBPASSWORD -e WORDPRESS_DB_USER=WPDBACCOUNT \
--link blog-mysql:mysql -v wordpress-data:/var/www/html -p 80:80 \
-w /var/www/html/wordpress -d wordpress:latest

The reason is that I can run a backup job inside the container. Important for the DB backup as now I can use msqldump. Before it was: stop mysql, tar up the DB files, start MySQL again.

Making a backup in each container:

tar -C /var/www/html -z -f /backup/blog-wp-`data +%Y-%m-%d.tar.gz .

resp.

mysqldump -pROOTMYSQLASSWORD --all-databases | gzip >/backup/blog-db-`date +%Y-%m-%d`.tar.gz

Now the problem is how to get those files out and to where…

Dropbox/Google Cloud don’t offer access via ftp/scp/etc. Time to look into the various storage offerings from Google/Amazon/Azure.

Jan 022016
 
Moving dockerized WordPress

One advantage of Docker is the easy move to other Docker providers. In my case: Moving from Google Cloud to Amazon’s AWS. Same instance size, same OS (CoreOS 877). The main difference is the location: Google’s one is in TW, AWS’s one is in JP.

So I start with my MySQL/Wordpress instance from here to AWS.

  1. Create a t1.micro instance with CoreOS 877 (1 shared CPU, 0.6 GB RAM)
  2. Set up ssh authentication for the main user (core for CoreOS, root usually)
  3. Create 3 docker containers and populate them with the last backup of the current instance of MySQL/Wordpress.
    1. Stop WordPress/MySQL. Mount the data volumes to the backup volume. Run a backup.
    2. Start MySQL/WordPress again
  4. Copy those 2 tar files to the new CoreOS AWS server.
  5. Restore the data volumes.
  6. Here wish that Docker would allow copying data volumes from A to B.
  7. Run the very same docker commands to run MySQL and WordPress.
  8. Change DNS (or test by faking a DNS change on the desktop client which runs the browser)

And lo-and-behold, it worked as expected. No issue at all.

When you can read this, then this blog already moved to run on AWS. I’ll keep it here for a while.