Oct 162016
 
Node-RED: Functions

My light sensor (actually just a LDR connected to the single ADC pin on the ESP8266) tends to be a bit jumpy and the graphs looked anything but smooth. Quick fix: averaging samples. Node-RED has functions for this. And here is one to average 4 samples:

// jshint esversion: 6

const oldDataMax=4;
let lastData;
let count = context.get('count')||0;
let oldData = context.get('oldData')||[];

// Need to shift all numbers one left if array full
// Circular buffer would be nice, but overly complex for such small buffers

if (count==oldDataMax) {
 for (let i=1; i<oldDataMax; ++i) {
 oldData[i-1]=oldData[i];
 }
 lastData=oldDataMax-1;
} else {
 lastData=count++; 
}
oldData[lastData]=parseInt(msg.payload);

// Calculate the average

let avg=0;
for (let i=0; i<=lastData; ++i) {
 avg+=oldData[i];
 }
avg=avg/(lastData+1);

context.set('count', count);
context.set('oldData', oldData);

let avgMsg = { payload: ""+avg };

return [ msg, avgMsg ];

Much less jumpy graphs now!
 

Sep 222016
 

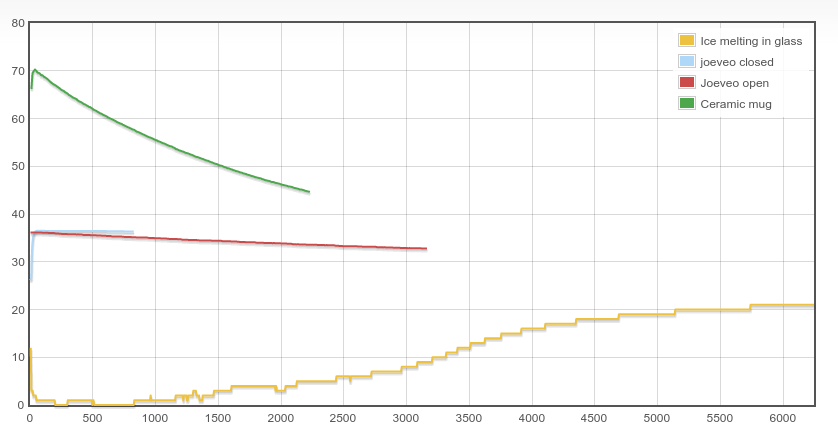
I bought a small waterproof DS18B20 based temperature probe. Finally I had a reason to use it: to measure the temperature drop in the joeveo mug which I received 2 days ago. While the theory is sound, it’s one thing to just believe in it or to measure yourself. I pick the latter, especially if it it involves some programming!

Temperature over time for various things

x: time in seconds, y: temperature in degrees Celsius

Using flot (for now) to make a quick graph, I got a sense of temperature drop in my normal ceramic mug as well as an idea of the drop in an insulation mug. The first graph (ice melting in glass) was using integers for the temperature.  The DS18B20 can clearly do better, so the next measurements I did with the floating point NodeMCU firmware.

Here the trivial code:

ds18b20 = require("ds18b20")
gpio0 = 3
ds18b20.setup(gpio0)

# plot temp over time

mytime0 = tmr.time()
n = 0

function plot_temp()
 uart.write(0, "["..tmr.time()-mytime0..","..ds18b20.read().."],")
 n = n > 4 and 0 or n+1
 if n == 0 then
  print()
 end
end

tmr.alarm(0, 10000, tmr.ALARM_AUTO, plot_temp)

Integrate the output into a HTML et voilà: a simple yet good looking graph.

Step 2 is to actually measure the temperature in the joeveo mug.


Aug 142016
 

When you have a microcontroller which can connect to the network and it has a RGB LED, the logical step is to make this LED controllable via a web browser.

The list of issues faced is numerous:

  • NodeMCU does not handle websockets natively
  • Thus a bridge between normal TCP sockets used by NodeMCU and WebSockets used by the web browser is needed: ws-tcp-bridge does that
  • ws-tcp-bridge defaults to binary blobs which the browser cannot handle. Switching the websocket’s binaryType to arraybuffer fixes this
  • Sending data too fast to a just created websocket which has its binaryType not yet changed to arraybuffer breaks ws-tcp-bridge with a fatal error:
    TypeError: “list” argument must be an Array of Buffers
  • NodeMCU uses Lua, the browser JavaScript. The langages are quite similar! See below for an example.

Code is at https://github.com/haraldkubota/rgbled-websocket

Interesting is the comparison of Lua and JavaScript variable names are the same):

JavaScript Lua
for (c of s.split('')) {

  if (c>='0' && c<='9') {
    if (state==1)
      value=10*value+c.charCodeAt()-48;

    } else {
      if (state==1) {
        setOneColor(color, value);
        state=0;
      }
      if (c=='R' || c=='G' || c=='B') {
        color=c;
        value=0;
        state=1;
      }
   }
}
for n=1,s:len(),1 do
   c=s:sub(n, n)
   if c>='0' and c<='9' then
     if state==1 then
       value=value*10+c:byte(1)-48
     end
   else
     if state==1 then
       setOneColor(color, value)
       state=0
     end
     if c=='R' or c=='G' or c=='B' then
       color=c
       value=0
       state=1
     end
   end
 end


Apr 302016
 
My Lifx Bulbs - Resurrected

Some time ago (2013? 2014?) I ordered 2 Lifx bulbs: WiFi connected LED lamps did sound awesome to have. The software resp. firmware was unfortunately flakey (connecting to WiFi took many tries, and occasionally it stopped responding to WiFi). There was also no official API. In the end, it was a pair of unreliable lamps. They worked fine as “dump lamps” though. Last year I tried again, and the software and firmware improve, but I had no lamp that could handle the weight (about 300g).

However, I checked last week and the software improved: new firmware 2.0 available. And plenty APIs documented and plenty connectivity to cloud services. Worth to have another look at those Lifx bulbs.

So I bought a nice clamp light which has no issue with the weight (and a very strong clamp).

The Android app (version 3.5) works. Connecting to the bulk was still a hit-and-miss, but after 3 tries all worked. New firmware is now on both bulbs with the promise that further firmware updates won’t take 30min… we’ll see.

The more fun part is programming the bulbs to do things like “Wake me up in the morning”. I took this as a challende to program in node.js as I imagined a command (for Linux of course) would be too easy (cron+command=done).

There a neat lifx library for node.js available here which was a very good start. Took several attempts to understand how it works, but once it made ‘click’, it was straightforward. And reliable too. Kudos to Marius for the nice library. My result is here and while small, I’m happy about the result.

And because it’s running on node.js, it works on my little fanless ARM Linux machines too.

Dec 312015
 
Synology git

Running git on github is great, but since all repositories are public, there’s a certain danger to publish password, API keys or similar on it. See here.

Since I got a Synology NAS, I can install a git server package! Except it does not do a lot, but it’s enough to get started and have my repositories on NAS. One central location. One location where making a backup is much easier than on random devices.

Requirements for this to work:

  • Enable ssh access on the NAS
  • Have a home directory with .ssh and .ssh/authorized_keys so you can log in via ssh and without needing to enter a password

Now to set up a git repository:

  • Install the git server Synology package
  • Log in as root on the NAS
  • cd /volumeX (x=1 in my case since I have only one volume)
    mkdir git-repos ; chown YOURACCOUNT:users git-repos
  • Log in as you on the NAS
  • cd git-repos
    mkdir dockerstuff; cd dockerstuff ; git init --bare --shared ; cd ..
  • Repeat for other repositories/directories

Now on a git client do:

  • git clone ds.lan:/volume1/git_repos/dockerstuff
  • put files in here
  • git add * ; git commit -a -m "Initial population" ; git push