Azure is more expensive than I expected

Azure has a habit of charging me more than I expect. Neither AWS nor GC does that and in both of the latter cases I'm either fully aware of the costs, or it's lower than expected thanks to the moderately generous free tiers, which I usually fall under.

But Azure is different.

During a workshop I used an "integration account" which costs staggering (about) US$30/day. To be fair, it's for enterprises, so it's actually not too expensive for what it does, but I used this by accident and it consumes all of the US$200 of have-fun-and-play-with-it in 7 days. I was not even using it for 6 of those 7 days.

The second time I try the very good Build a serverless web app in Azure. I like it a lot. Instructive, with command line instead of mouse clicking. Really nice and highly recommended. It's using a Dynamo DB database. I use 170 MB at 100 RU/s. That's 5 Yen in total for storage (no issue here), and 96 Yen per day for the reserved capacity. Does not sound too bad, but it's 3000 Yen (about US$30) per month while not using it.

AWS does have some tricky items too (load balancers, RDS instances, RedShift etc.) which costs, but I am aware of those and avoid them if I can. Google is usually cheaper than expected and I never had a negative price surprise either.

But Azure...twice they got me. There will be no third time. I'll have to learn their costing model before I'll use Azure again.

Comments

AWS S3 Signed URL's

I saw some questions on the web regarding signed S3 URLs. Those would allow someone else (not an AWS IAM user) to access S3 objects. E.g. if I have a program which has permissions to a given S3 object, I can create a signed URL which allows anyone with the knowledge of that URL to (e.g.) read the object. Or write. A simple example would be a video training web site: I could give the user a URL which is valid 24h to they can watch a video as many times as they like, but 24h only. The alternative would be the URL of the S3 object directly.

There are many ways to solve this problem, but signed URLs is what AWS offers.

Since there were so many postings and questions around this, I wondered what the problem was. The documentation at https://docs.aws.amazon.com/AWSJavaScriptSDK/latest/AWS/S3.html#getSignedUrl-property certainly looked straightforward.

So a quick program created:

const AWS = require('aws-sdk')

const s3 = new AWS.S3()
// above is using ~/.aws/config.json to get my API key credentials
// That API key inside config.json obviously has permission to the object.
// A normal web browser cannot access the S3 URL ythough as the
// bucket is not public.

const myBucket = 'BUCKET'
const myKey = 'FILE.json'
const signedUrlExpireSeconds = 60 * 5 // 5min

const url = s3.getSignedUrl('getObject', {
    Bucket: myBucket,
    Key: myKey,
    Expires: signedUrlExpireSeconds
})

console.log(url)

and it all worked (AccessKeyId has access to the S3 object):

harald@blue:~/js/aws$ node sign.js 
https://BUCKET.s3.amazonaws.com/FILE.json?AWSAccessKeyId=AXXXXXXXXXXXXXXXXXXA&Expires=1529832632&Signature=D7eArF9AMFyWr%2FLoXcCQ0pA72i8%3D
harald@blue:~/js/aws$ curl "https://BUCKET.s3.amazonaws.com/FILE.json?AWSAccessKeyId=AXXXXXXXXXXXXXXXXXXA&Expires=1529832632&Signature=D7eArF9AMFyWr%2FLoXcCQ0pA72i8%3D"
{
      "AWSTemplateFormatVersion" : "2010-09-09",
      "Resources" : {
[...]
}

It's as easy as I thought.

Comments

CloudFormation - A Sample

I'm not sure I like AWS CloudFormation (CF). Beside the obvious lock-in I currently would rather use TerraForm or similar to describe what infrastructure I want. However CF will always have the most complete features especially for new AWS services, so it's probably good to know. And one day you'd possibly have to modify a CF configuration file, so it's a really good thing to know if you work with AWS.

Anyway, my observations:

  1. I do not recommend to use JSON for CF. Use YAML. It's much shorter and much easier to read. I usually like JSON, but here it's outclassed by YAML.
  2. As a PowerUser, to use CF you need some extra permissions:
    1. iam:CreateInstanceProfile
    2. iam:DeleteInstanceProfile
    3. iam:PassRole
    4. iam:DeleteRole
    5. iam:AddRoleToInstanceProfile
    6. iam:RemoveRoleFromInstanceProfile

Here are the command lines to use:

aws cloudformation create-stack --template-body file://OneEC2AndDNS.yaml --stack-name OneEC2 \
--parameters ParameterKey=InstanceType,ParameterValue=t2.nano --capabilities CAPABILITY_IAM

To see what was created (takes about 4 min 20 sec):

aws cloudformation describe-stacks --stack-name=OneEC2-6

gives you this output (some data replaced by X):

aws cloudformation describe-stacks --stack-name=OneEC2-6
    "Stacks": [
        {
            "StackId": "arn:aws:cloudformation:ap-northeast-1:XXXXXXXXXXXX:stack/OneEC2-6/XXXXXXXX-XXXX-XXXX-XXXX-XXXXXXXXXXXX", 
            "Description": "Build EC2 instance with current AWS Linux and create a DNS entry in aws.qw2.org", 
            "Parameters": [
                {
                    "ParameterValue": "aws.qw2.org", 
                    "ParameterKey": "HostedZone"
                }, 
                {
                    "ParameterValue": "t2.nano", 
                    "ParameterKey": "InstanceType"
                }
            ], 
            "Tags": [], 
            "Outputs": [
                {
                    "Description": "Fully qualified domain name", 
                    "OutputKey": "DomainName", 
                    "OutputValue": "i-034dcbb1c60d1e062.ap-northeast-1.aws.qw2.org"
                }
            ], 
            "CreationTime": "2018-03-11T12:57:50.851Z", 
            "Capabilities": [
                "CAPABILITY_IAM"
            ], 
            "StackName": "OneEC2-6", 
            "NotificationARNs": [], 
            "StackStatus": "CREATE_COMPLETE", 
            "DisableRollback": false, 
            "RollbackConfiguration": {}
        }
    ]
}

And to delete it all (takes about 3 min 30 sec):

aws cloudformation delete-stack --stack-name=OneEC2-6
Comments

Moving Containers from CA to TK

From CA to TK

Moving Docker container is supposed to be easy, but when doing a move, why not clean up, modernize and improve? Which of course makes such a move as difficult as any non-Docker move.

I moved several containers/services by literally copying the directory with the docker-compose.yml file in it.  That same directory has all the mount points for the Docker images, so moving is as simple as

On the old VM:

ssh OLD_HOST 'tar cf - DIR_NAME' | tar xfv -

which, if you got the permissions, works like a charm. If you don't have the permissions to tar up the old directory (e.g. root owned files which are only root-readable, e.g. private keys). If you don have the permissions, then execute this (the tar as well as the un-tar) as root.

Then a

docker-compose up -d

and all is running now and will continue to run in case of a reboot.

Mail

For mail I wanted to go away from the home-made postfix-dovecot container I created a long time ago: with the constant thread of security issues, maintenance and updates are getting mandatory. Also I had no spam filter included which back then was less of a problem than it is now. So I was looking for a simpler to maintain mail solution. I would not have minded to pay for a commercial one. Most commercial email hosting companies are totally oversized for my needs though, but at the same time I have to host 2 or 3 DNS domains which often is not part of the smallest offering.

My requirements were modest:

  1. 2 or 3 DNS domains to host, with proper MX records
  2. IMAP4 and SMTP
  3. web mailer frontend for those times I cannot use my phone
  4. TLS everywhere with no certificate warnings (e.g. self-signed certificates) for SMTP, IMAP4 and webmail
  5. 2 users minimum, unlikely ever more than 5
  6. Aliases from the usual suspects (info, postmaster)
  7. Some anti-spam solution

In the end I decided to do self-hosting again, if only to not forget how this all works. Here is the docker-compose.yml file:

version: '3'

services:
  mailserver:
    image: analogic/poste.io
    volumes:
      - /home/USER_NAME/mymailserver/data:/data
      - /etc/localtime:/etc/localtime:ro
    ports:
      - "25:25"
      - "8080:80"
      - "110:110"
      - "143:143"
      - "8443:443"
      - "465:465"
      - "587:587"
      - "993:993"
      - "995:995"
    restart: always

You will have to configure the users and domains once incl. uploading the certificate (one certificate with two alternative names for 2 DNS domains). Also DKIM records (handled by poste.io), SPF (manual) and updating the MX records. It worked flawlessly!

Updating the Let's Encrypt certificate is not difficult: since all files are in the /data directory, updating those from outside the container is simple. It does need a restart of the container though.

One issue though:

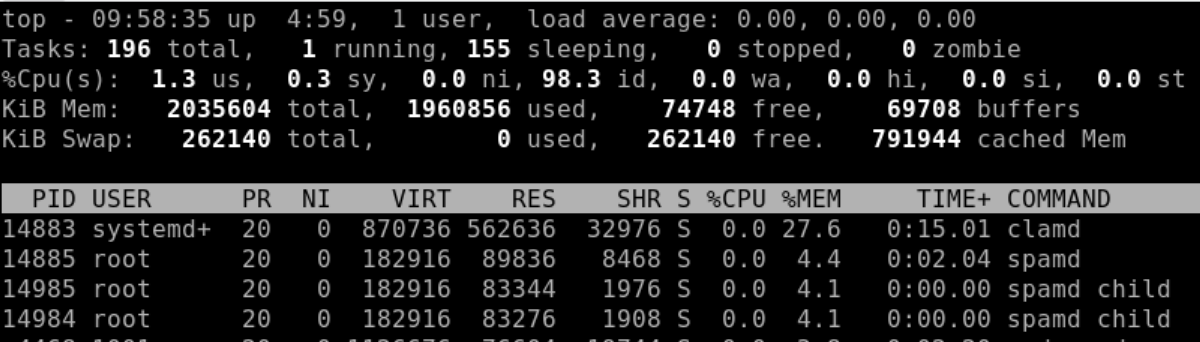
As you can see, quite a lot of memory is used: 27.6% of a 2 GB RAM VM. The small VM I started with had only 1 GB RAM, and while all was running, it was very low on free memory and had to use swap. That's the only drawback of this Docker image: you cannot turn off ClamAV. However maybe that's ok since viruses and malware are a real problem and this helps to contain it.

Comments

AWS Snippets

Find Latest AMI

Find latest Amazon Linux 2 image in us-east-1:

aws --region=us-east-1 ec2 describe-images --owners amazon --filters \
'Name=name,Values=amzn2-ami-hvm-*-x86_64-gp2' \
'Name=state,Values=available' | \
jq -r '.Images | sort_by(.CreationDate) | last(.[]).ImageId'

To verify or generally check out an AMI:

aws --region=us-east-1 ec2 describe-images --image-ids ami-XXXXXXX | jq .

Find latest Amazon Linux 2 images in all regions

regions=$(aws ec2 describe-regions --query 'Regions[].{Name:RegionName}' --output=text | sort)
for i in $regions ; do
  echo -n "$i "
  aws --region=$i ec2 describe-images --owners amazon \
  --filters 'Name=name,Values=amzn2-ami-hvm-*-x86_64-gp2' 'Name=state,Values=available' | \
  jq -r '.Images | sort_by(.CreationDate) | last(.[]).ImageId'
done

List all Regions

aws ec2 describe-regions --query 'Regions[].{Name:RegionName}' --output=text | sort
# same as
aws ec2 describe-regions | jq -r '.Regions | sort_by(.RegionName) | .[].RegionName'

See also https://github.com/haraldkubota/aws-stuff for some more examples using NodeJS instead of the AWS CLI.

Comments